
For decades I have been teaching installers how to cut and seam around many objects. The most challenging seaming process to me has always been cutting and seaming around playground poles. Actually, cutting around the pole itself is quite easy; it’s all the other stuff that comes before it that makes the process difficult. This month I will explain what it takes to be successful at seaming synthetic turf playgrounds.
– JW

Holy poles, Batman!
This is what I said when I arrived at Dennis the Menace City Park in Midland, Texas to witness not one, but four huge playgrounds with so many poles they looked like porcupines!
But you all should know JW wouldn’t arrive at any project, especially one I am training on, and not be prepared with a plan.
Fail to Plan? Plan on Visble Seams


Installing synthetic turf at playgrounds must start with a written plan. It is crucial to design a plan and/or schematic of the layout according to the synthetic turf roll sizes. If you need to cut off 3 feet from an entire roll to place the seamline down a set of playground poles that are embedded in concrete, then this is what you must do. Having a seam in areas of high foot traffic will reduce the longevity of the entire system.


Drone shots are beneficial for better views of how the team should layout and place seams, especially after the holes are dug. The images above are what I call “drone-planning.” If you have a drone or know someone who has one, drone shots taken from above allow the capability to better plan the installation and where the seams will be placed. As you can see in the drone images above, there are sections of synthetic turf that will be a few feet wide to be centered and hidden at playground poles.

After the playground equipment is installed, it is important to perform field measurements to ensure the layout of seams is in conjunction with the plan/schematic and playground poles.
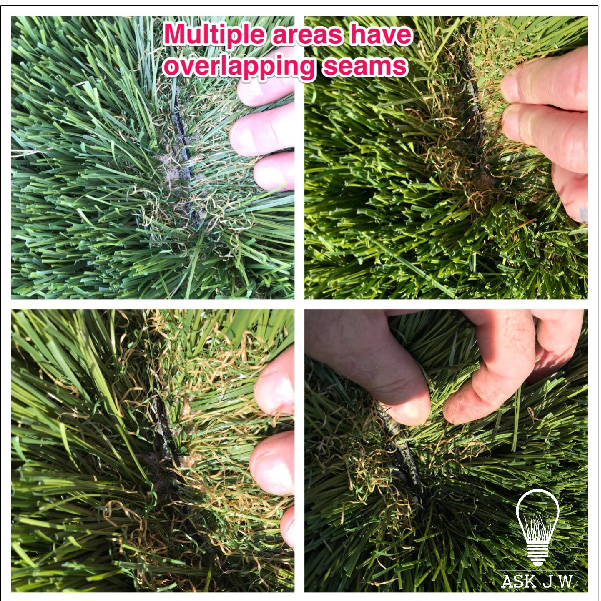
Overlapping connections of head seams will cause the seam to be visible. When you have overlapping head seams, it may cause trip hazards.
Always double-check the seamline before placing turf infill. It is much harder to repair seams when the infill is complete.
Be prepared to re-layout the entire plan/schematic onsite. This will confirm the synthetic turf measurements needed for cuts and placement.
DO NOT PLACE TURF OVER SHOCKPAD THAT IS INSTALLED INCORRECTLY!


It is crucial to inspect the underlayment and shock pad before installing turf to ensure it is installed correctly. I have witnessed poor workmanship leaving shock pads having holes, surface damage, and large gaps around poles that were cut wrong. These imperfections will “mirror” through the surface of the turf, cause seam rupture, and lessen the longevity of the system.


The shock pad installation must have a smooth surface when completed. Shock pads placed with a difference in height will “mirror” through the turf’s surface like the above image to the right.
Craftmanship Prevails


You install a shock pad without care, it will show in your completed installation.
Shock Pad Storage & Care

Do not expect your shock pad installation to lay flat if you do not take care of its storage and jobsite stocking. If the shock padding becomes deformed due to its storage and stocking, you may as well throw it away. Not only will you struggle with its installation, but it may not meet its head injury criteria.
If you would like to learn about placing membranes on top of shock pads for longevity, such as the image to the left, please reach out to me.
For more information on shock pad installation methods, please read my column, “Shock Pad Failures.”
Staples


As I mentioned above, any seam layout should be pre-planned, so the team will understand where they need to place and hide the seamline with the center of the poles. Take the measurements painted on the ground during on-site seam layout and repeat by marking the top of the placed shock pad.
DO NOT PLACE SEAMS IN HIGH FOOT TRAFFIC AREAS!!!


If possible, do not place seams where heavy foot traffic may cause seam separation. I recommend adjusting the layout to ensure seams are not set in these areas. If it is a must and you have to place seams due to other significant factors, I recommend using Superseam Pro 444 adhesive to bond the seams. Superseam Pro 444 is the strongest adhesive in the synthetic turf industry today.
High Traffic Areas


I recommend placing nylon putting green materials for swing sets, slide exits, and other areas where heavy foot traffic may cause premature wear. The nylon material is more aggressive than most landscape fibers and will assist in longevity.
Turf Installation
Before we get started, here is a JW installation tip that will make your installation less stressful.


Seaming in and around playground poles is hard enough. Now add all those steps, platforms, chains, and chair mounts, and you have your work cut out for you (no pun intended). After the equipment is in place and secured, I recommend removing all steps, platforms, chains, and chair mounts so that the turf can be cut with a slight relief cut and/or hole to slip over the poles, springs, and rider mounts. This may be a small task in comparison to adding additional seams.
Turf Placement

Placing synthetic turf in and around playground poles can be labor-intensive. I recommend having enough team members to assist the placement. This will make it much easier than tugging around large sections just to get them into the correct place.
Cutting

When cutting and placing sections of turf, it is crucial to keep the center of seam under playground equipment and, if possible, between playground poles. This will assist in avoiding foot traffic, which will give longevity to the system.
Seam Tape, Adhesive, & Compression


Why Adhesive Seam Compression?
When installing multiple sections of synthetic turf, you will have no choice but to join the two together to achieve a unified look. Using methods like stitching with nails or staples, velcro, or sticky tape is not recommended for playgrounds due to continuous movement and embeds causing injury. If you do not use a superior adhesive, you may succumb to seam separation or rupture. When synthetic turf is in direct sunlight and exposed to high temperatures, it will expand and contract, especially over shock pad. This is actually normal due to its flexible make-up. Even though synthetic turf is flexible and can withstand the elements, it may also move, crack, split, and rupture if not made of quality materials or maintained properly.

I recommend unifying synthetic turf seams by using quality seaming tape and adhesive. Quality adhesives like Superseam Pro 444 (when applied correctly) will unify the seam as one and prevent seam separation. Always choose a seaming tape and adhesive that will last throughout the warranty of the turf. When installing seams with adhesive, it is crucial to understand that compression will create a strong bond between the turf’s backing and the seaming tape. This, my friends, will prevent movement and separations of seams, especially if you are installing in very hot regions.
Adhesive Compression Cutview


Adhesive compression allows the adhesive to be forced into voids and capillaries within its adhesive zone and ensures bonding performance. When the turf is laid upon the seaming tape, the stitch rows on the back of synthetic turf are elevated above the backing’s surface, leaving gaps running along the stitch rows. When the correct application of adhesive and total compression is applied, the compression will cause the adhesive to fill these stitch row gaps and voids. The compression will also push out any air that may cause future seam separation or rupture.

The images show close-up and cut views of how compression forced the adhesive up and through the stitch rows, gauges, and backing. Compression prevents voids and air pockets from occurring between the seaming tape and the backing of the turf, which gives longevity to the system. Optimum performance is when the synthetic turf adhesive is applied with the correct tool, at the correct thickness, with even compression throughout the curing process.
When securing seams on top of shock pad, you will need to ensure that the seam does not move during its curing process. This is crucial when temperatures are very hot. When the sun is bearing down on your installation, I guarantee that the seam will move due to expansion and contraction. In this case, you will need to connect, compress, and secure. This means you will need to maintain compression on the seamline during the curing stage.

I recommend using the “JW Triangle Method” when placing temporary nails to keep the turf in position while seaming. One nail may move during the seaming process, especially if it is hot outside.
“Ask JW” Bagging Method


If you want to perfect hiding your seams, this is a method that I created to assist in the “magic of invisibility.” This technique vertically elevates and integrates the fibers and creates a memory of their position while waiting for the curing process. This also helps prevent excessive adhesive from reaching the fibers. When the infill bags are removed, the method causes the fibers to cross, integrate, and hide the seamline; it’s pretty cool if you master it. There is a video attached to show how easy it is, and the results are Magical!
- When placing the first bag, place it vertically and lay it over a team member’s hands.
- Assist in flattening the bag to create even compression.
- The team member will pull his hands from underneath the bag, pulling(clawing) the turf fibers vertically.
- Repeat these steps till you have reached the end of the seam.
“ Below is a video that will assist you in this seam bagging technique… Try it, you will be amazed” – JW
“Ask JW” “Plastic Cap Nail” Compression Method for Playground Installation Over Shock Pads

I have always mentioned in my previous columns that compression of adhesives will create longevity between the bond and the backing of the synthetic turf. When installing seams over shock pad, the padding cushion may cause the seam to move, especially if you are not careful. Stepping alongside the seamline on top of the foam shock pad alone can move the seam ½ inch. I created this method of placing plastic cap nails temporarily for compression, which works great when seaming on top of shock padding. When stitched correctly, the adhesive will cure with a strong bond.
Infill Placement


I recommend “Hand-placing” Infill at seamline and around all playground equipment. This will ensure the trapping of fibers and prevent seam separation by brushing.
Infill Placement & Moisture

“Fail to plan, plan to fail;” that is the thought that should be going through every synthetic turf contractor’s mind when scheduling your Infill placement. Sending your teams to install infill when there is a chance of precipitation will cost you time, money and lots of frustration. Precipitation (rain, snow, sleet, or hail) can cause havoc on your synthetic turf installation. When moisture comes in contact with synthetic turf fibers, it sticks to the fibers and prevents infill from dropping into and down to the base of the synthetic turf. Moisture can prevent infill materials from doing their job. If the playground is lacking infill, it may fail HIC testing.

Static electricity may confuse your frontline. They may think it is full, but static will fool you. It is essential to ensure that the proper amounts of infill are being placed in the playground system.
If you succumb to static electricity, you may need to spray an anti-static spray to complete the infilling process. If the playground is lacking infill, it may fail HIC testing.
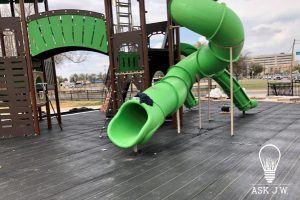
If Your Team is Strategically on the Same Page, You Will Go From This..
To This


For more information regarding head seams or would like to schedule a training or webinar, please contact J.W. at askjw@sgwcorp.com or call (888) 846-3598.
Suggestions for the use of ASK JW installation techniques are solely at the end users’ discretion; however, the user should determine suitability for the intended use by his/her own evaluation. Because the use of the materials is beyond our control, neither ASK JW nor SGW shall be liable for the outcome of any use of said materials, including any injury, loss, or damage, direct or consequential, arising out of the use or inability to use these techniques and products.


