


")
Decades ago, when I first started installing synthetic turf, the turf was very different than it is now.
The turf itself was more like an outdoor short pile carpet look. You know, the green outdoor carpet that many put all over their porches. Most pile heights maxed out at ½” unless they were made for sports, and even the sports turf products were very short. Your compaction had to be very smooth, or all imperfections would reveal themselves through the turf. We either placed Coal Slag or Dirty Silica to keep it from blowing away, which we now call infill & ballast. Over the years, fiber configuration and pile heights have changed dramatically as well. Internal textured thatch was added, which assisted the stability of the product. However, one thing that has not changed: seam ruptures.
This month, Ask JW will express the importance of adhesive compression and why it is crucial for the longevity of the entire system.
What is Adhesive Compression?

I am certain that we all have experienced our share of gluing things back together.
When was the last time you broke a dish, glass, or object that needed to be glued back together?
Did you hold it together while the glue dried?

Most objects or materials that are to be unified by adhesives need some type of compression while in its curing stage. Compression allows the adhesive to be forced into voids and capillaries within its adhesive zone and ensures the bonding performance.


What is Adhesive Seam Compression?
When installing multiple sections of synthetic turf, you will have no choice but to join the two together to achieve a unified look. If you use methods like stitching, velcro, or sticky tape, you may succumb to seam separation/rupture. This will intensify if the areas experience thermal expansion & contraction, also known as yarn shrinkage. When synthetic turf is in direct sunlight and/or exposed to high temperatures, it will expand and contract. This is actually normal due to its flexible make-up. Even though synthetic turf is flexible and can withstand the elements, it may still move, crack, split, and rupture if not made of quality materials and/or maintained properly.
I recommend unifying synthetic turf seams by using a quality seaming tape and adhesive. Quality adhesives like Superseam Pro 444 (when applied correctly) will unify the seam as one and prevent seam separation. Always choose a seaming tape and adhesive that will last throughout the warranty of the turf. When installing seams with adhesive, it is crucial to understand that compression will create a strong bond between the backing of the turf and the seaming tape. This, my friends, will prevent movement and separations of seams, especially if you are installing in very hot regions.


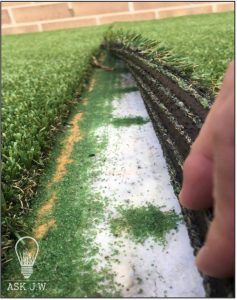
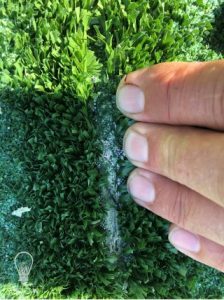
Adhesive Compression Cut View
Adhesive compression allows the adhesive to be forced into voids and capillaries within its adhesive zone and ensures the bonding performance. When the turf is laid upon the seaming tape, the stitch rows on the back of synthetic turf are elevated above the backings surface which leaves gaps running along the stitch rows itself. When the correct application of adhesive and total compression is applied, the compression will cause the adhesive to fill these stitch row gaps and voids. The compression will also push out any air that may cause future seam separation/rupture.

The images show close-up and cut views of how compression forced the adhesive up and through the stitch rows, gauges, and backing. Compression prevents voids and air pockets from occurring between the seaming tape and the backing of the turf, which gives longevity to the system. Optimum performance is when the synthetic turf adhesive is applied with the correct tool, at the correct thickness, with even compression throughout the curing process.
I recommend installing seaming tape and adhesive early in the morning or late in the afternoon to prevent yarn shrinkage. The heat of the day will not only cause the seam to expand and contract, but it will also cause the adhesive to cure too quickly. When adhesives cure before compression can be achieved, possible separation/rupture will occur.


What is the Best Way to Calculate and Achieve Adhesive Compression?
I have seen so many ways that contractors try to achieve adhesive compression. Many of them I do not agree with, and there is a reason behind it. I had mentioned above “total compression”. Depending on the width of your seaming tape and adhesive application, you will need to figure out what you will need to use for the compression method. It is important to ensure that the entire seam line is compressed equally and evenly. I have seen contractors use everything under the sun for compression, and they will likely experience some type of seam separation if the adhesive is not cured and equally bonded throughout the seamline.
Depending on the adhesive and manufacturer’s instructions, compression may vary. When using the Superseam Adhesives (Pro 444 and 283C) and 12” seaming tape, I recommend using a 50-pound infill bag for seam compression. This will give the compression approximately 25 pounds of force per foot at 1/8” application thickness.
Input Interpretation
300 in lbf (pound-force inches) to feet = 25 ft lbf (foot pounds-force)


What Should I Use For Compression?
Believe it or not, placing bags on lumber will not give you equal and even compression.
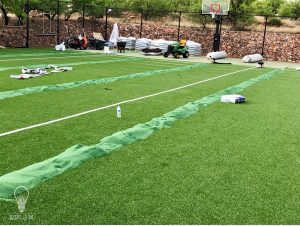
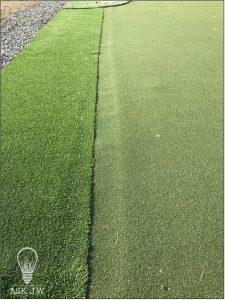
The image to the left shows how thermal expansion will “call you out” on uneven compression. The entire seam line must be evenly compressed to prevent crowning of the turf. This contractor had to make costly repairs.
Emptying out turf infill and piling it on the seam is not a good method of compression. The piled infill may cause the infill to contaminate the adhesive during the curing process.
Using wooden pallets to bridge both sections of the seam line does not give enough force to compress the adhesive properly. It is also backbreaking to move from seam to seam and uncontrollable while maintaining the seam inspection during curing.

Water-rolling, depending on the length of the seam, may cause uneven curing of the adhesive. When urethane adhesives cure, they expand. The water roller may not stay ahead of the curing process and will leave behind elevated areas. Water-rolling of the seam may produce ripples in the seamline. A water roller may cause the turf to “wave” in front of the roller and cause the turf to lift. Be very careful and go slowly if you choose to water-roll.
Timing is Everything

When it comes to adhesive compression, timing is everything. I have witnessed contractors take off the compression too early and experience seam separation. I also have seen installations that were ruined due to the contractor leaving weight on the seam line overnight. DON’T DO IT!

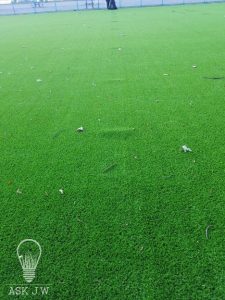
The image to the left is showing many things that possibly went wrong during the application and compression process.
- Adhesive thickness may have been too thin. It is crucial to read the adhesive manufacturer’s thickness chart, application rates, and curing times.
- The adhesive was allowed to “skin” before compression was applied. Skin time is the time required before the surface of the adhesive is dry to the touch. If you have very long seams, it is important to have enough labor to assist in getting the adhesive applied and the seam line compressed before the adhesive starts to “skin”.
- The seam did not have enough compression for the adhesive to compress, seep, and bond to the turf backing. You can see this by how clean the backing and stitch rows are.
The image to the left shows great compression, but one must be careful not to leave compression on too long.


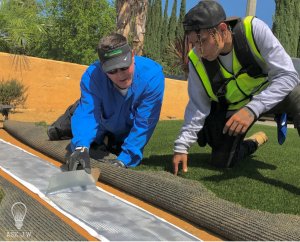
Compression & Teamwork
It is imperative that you have enough team members to achieve successful seam installations. If you are short in manpower, you will be short in quality.
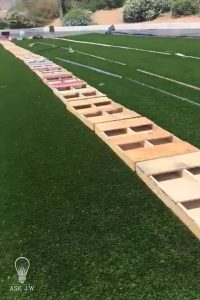
Most landscape synthetic turf needs ballast and Infill. I recommend using the infill bags (50lbs) to compress your seamline.
Having enough help will allow the “bag man” to camouflage the seam with the JW bagging trick mentioned below.


Continous Inspection
Continuous inspections of the seam throughout the seaming process are very important, especially for hot summer installations. The heat may cause the synthetic turf to expand and contract, which will cause the turf to move. After the adhesive is placed, inspecting the seam while connecting both sections together will allow the installer to make adjustments and ensure that the seam line has a complete/even/equal bond. When applying adhesive on days with higher temperatures, always inspect the installed seam throughout the curing process. This will prevent the adhesive from bubbling or seeping up through the seam and drainage holes. It will also allow you to close any gaps that may have occurred due to the heat and yarn shrinkage.
Just because you have other tasks to complete does not mean you avoid continuous inspecting of the seam. Make sure each bag is kept tightly placed together. If there are gaps in the bags, it will cause small ripples in the seam and may not be able to even out after.
Placing the wrong adhesive, especially in hot summer months, may cause the adhesive to expand, foam, seep up through the seam line, and stick to the fibers, making the seam visible. Remember to always respect the applied thickness of the adhesive or it may ruin your entire installation and your day.
Putting Greens & Compresssion


Synthetic turf putting greens are very susceptible to thermal expansion and contraction. Putting green materials are not very thick, which makes them a good candidate for thermal movement. When putting greens move, causing shrinkage or seam rupture, there is only one option: removal and replacement. Compression is crucial when seaming synthetic turf putting green materials. When seaming putting greens, I recommend using Superseam Pro 444 turf adhesive. Superseam Pro 444 will penetrate deep into all backings and create a very strong bond, unlike filler-based adhesives.


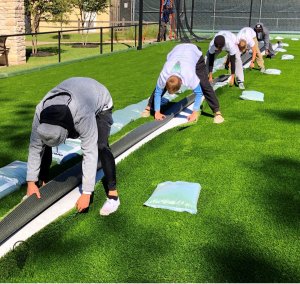
JW Bagging Method
If you want to perfect hiding your seams, this is a method that I created to assist in the magic of invisibility. This technique elevates and integrates the fibers vertically, and it creates memory of their position while waiting for the curing process. This also helps prevent excess adhesive from reaching the fibers. When the infill bags are removed, the method causes the fibers to cross, integrate, and hide the seam line. It’s pretty cool if you master it. There is a video attached to show how easy it is, and the end results are magical!
- When placing the first bag, place it vertically and lay it over a team member’s hands.
- Assist in flattening the bag to create even compression.
- The team member will pull his hands from underneath the bag, pulling the turf fibers vertically.
- Repeat these steps till you have reached the end of the seam.
Below is a video that will assist you in this seam bagging technique… Try it, you will be amazed
Plastic Cap Nail Compression Method for Shock Pads
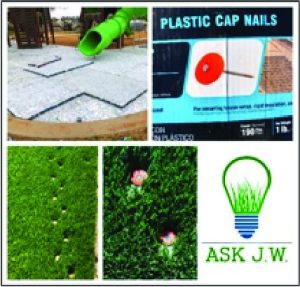
I have always mentioned in my previous columns that compression of adhesives will create longevity between the bond and the backing of the synthetic turf. When installing seams over the shock pad, the cushion of the padding may cause the seam to move, especially if you are not careful. Stepping alongside the seam line that is on top of the foam shock pad alone can move the seam half an inch. I created this method of placing plastic cap nails temporarily for compression, which works great when seaming on top of shock padding. The grooves in the nail bond and compress. When stitched correctly, it will allow the adhesive to cure with a strong bond.

I understand that many of you may not use seaming tape and adhesive to unify your sections of synthetic turf together. Being in the industry for almost three decades, I have personally witnessed thousands of seam ruptures due to seams being constructed with nails, staples, sticky tape, Velcro, drywall tape, and many more materials that installers felt would work. The problem I see with seam separation and ruptures is due to the sections pulling against each other, which causes stress on the entire seam line. Why chance seam failure with nails, staples, sticky tape, Velcro, drywall tape, et cetera while rolling the dice of the seam separating?


Throughout my turf career, I have had the opportunity to go back and visit many of the commercial installations that I had personally installed. There were many ways we installed seams decades ago, and many of them I am against now. We live and we learn. I feel the only way we get better is if we see and learn from our mistakes. Making mistakes on turf seams can be costly. Therefore, I am certain that by using a quality seaming tape and adhesive, you can create invisible seams that will outlast the warranty period. You would be amazed how seeing the longevity of your work will make you a better craftsman in the synthetic turf industry.
I feel — and it has been proven — that it is best practice to unify synthetic turf seams by using the seaming tape and adhesive method. There is little to no manipulation of fibers, backing, or the entire system.


For more information regarding placing synthetic turf for putting green, or to schedule a training, please contact J.W. at (888) 846-3598 or email AskJW@SGWcorp.com
Suggestions for the use of ASK JW installation techniques are solely at the end users’ discretion; however, the user should determine suitability for the intended use by his/her own evaluation. Because the use of the materials is beyond our control, neither ASK JW nor SGW shall be liable for the outcome of any use of said materials including any injury, loss, or damage, direct or consequential, arising out of the use or inability to use these techniques and products.


