


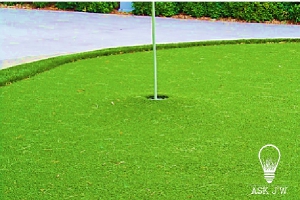
Synthetic turf putting greens are exciting, lots of fun, and can improve your golf game. When installed correctly, synthetic turf putting greens simulate real play and can last past their warranty period. Depending on which putting green surface you have chosen, there may be little to no maintenance needed. Putting green surfaces receive a lot of foot traffic which causes the surface to matt, depress, and cause irregular ball play. Putting green cups also take a beating. The pulling in-and-out of the flagstick causes vibrations which may cause the cup to sink, tilt, and become uneven or unlevel. When this happens, the surface around the putting green cup will create a hazard a golfer doesn’t want. This month, “ASK JW” will teach an easy method to restore putting green cups to the proper elevation.
Dirt or Concrete?


Many Installers ask me which is better, placing the cup in dirt or concrete? I recommend concrete for most regions of the country. Concrete allows stability, levelness, and longevity. There may be a downside to placing concrete around cups in extreme freezing temperatures. When the ground freezes during winter months, deep freezing may cause vertical and horizontal movement of the soils, which may cause the compacted soil around the cup to heave into a crown resembling a “volcano.”
Some Installers place sleeves to receive the cup when the installation is complete. If you are not going to place sleeves in concrete, they may move. You might as well place the cup in dirt by itself.
If you choose not to secure your cup with concrete, then it is crucial that you compact, re-compact by hand around the cup, and carve to make sure the area around the sleeve is smooth without any ridges from the sleeve protruding.
I have visited past installations spanning two decades, and cups placed in concrete were still in great condition, including the area around them. Cups placed in dirt couldn’t take the beating that a flagstick can do to the cup and its surrounding surface, especially when there is a heavy downpouring of rain the day before. Cups placed in concrete outlasted cups that were placed in dirt by far.
For more information, you may read my column regarding installation of putting green cups:


It is crucial to inspect the underlayment and shock pad before installing turf to ensure it is installed correctly. I have witnessed poor workmanship leaving shock pads having holes, surface damage, and large gaps around poles that were cut wrong. These imperfections will “mirror” through the surface of the turf, cause seam rupture, and lessen the longevity of the system.
Restoring the Elevation


If your putting cup has sunk or settled due to wear and tear, below are some steps you may take to loosen and return the cup to the proper elevation.
Tools that will be needed:
¼” Mason drill bit
Electric Hammer Drill
Spray Lubricant w/nozzle
Duct Tape
Two round steel concrete stakes
Patience
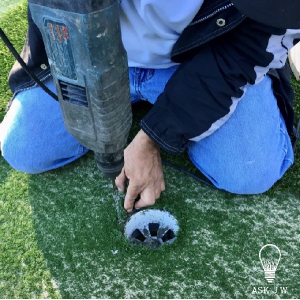
Attach a ¼” mason bit to a hammer drill and slowly drill beside the putting green cup and down into the surface.
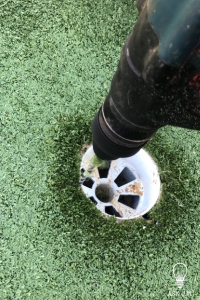
Do not pull out until you are ready to inject lubricant down into the drilled hole.
Most lubricants will work for this step but must have a nozzle.


Place the lubricant nozzle into the drilled hole and push till it hits the bottom.
Spray the lubricant generously while pulling the nozzle up and out.
You may repeat if necessary.
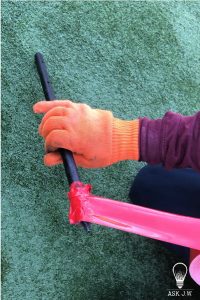
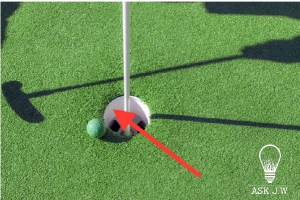
Using duct tape, wrap the end of two steel concrete stakes to create a protective barrier.


Insert both steel stakes into the putting green cup slots like the image above. Slowly twist until the cup breaks loose. If it is too difficult, DO NOT FORCE! You may need to place additional holes/lubricant until it loosens.

When the cup loosens, spin counterclockwise while slowly lifting to the proper elevation needed.
When the cup is lifted to the proper elevation, additional infill will be needed around the cup
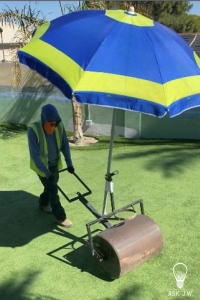
I recommend sanding, cutting, and rolling the entire putting green if you repair the cups. This will give restoration for the entire putting green.
Here is a video of the steps above in action:

For more information regarding cutting around playground poles or would like to schedule a training or webinar, please contact J.W.: askjw@sgwcorp.com or call 888.846.3598
Suggestions for the use of ASK JW installation techniques are solely at the end users’ discretion; however, the user should determine suitability for the intended use by his/her own evaluation. Because the use of the materials is beyond our control, neither ASK JW nor SGW shall be liable for the outcome of any use of said materials, including any injury, loss, or damage, direct or consequential, arising out of the use or inability to use these techniques and products.


