


Imagine having a synthetic turf area for multiple dogs to roll around on that remains green, plush, healthy, and smelling good. A place where peace of mind because you can rely on the area’s surface to service multiple dogs. A synthetic turf surface that is able to be cleaned, disinfected, flushed, and dried within an hour. This month, Ask JW will take you on a trip to California to visit a dog boarding facility that had little space, many dogs, and a desperate need for landscaping help.
I received a call from the owner of a boarding facility in Agoura Hills, California, asking for assistance on designing a pet system that would actually work. Since I was in California at the time, I told her I would stop by and take a look at her facility.
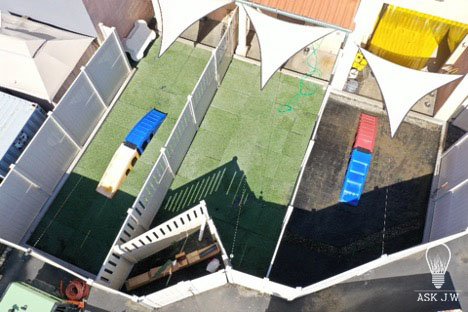
The facility was set up quite nicely. The outside boarding area was part of a rear parking lot that consisted of three areas that were fenced in with vinyl fencing and gates. The three areas separate dogs for cleaning and playtime, as well as separating them by size.

The surface of the fenced areas was tiles of synthetic turf adhered on a thin plastic frame with ¼” dimples. These turf tiles, as I would call them, did not have enough elevation above the asphalt’s surface, which caused the dog feces to end up in a “slurry”. This slurry rested upon the asphalt and never exited the area. I noticed that the existing asphalt didn’t have much slope to it and seemed to be the reason for her frustrations of combating the smell. We discussed surveying the existing elevations to see how to create a plan where “flushing” the turf could be accomplished.


The sludge and slurry of animal feces rested beneath the turf tiles, which created an unhealthy environment for the dogs and the employees. At this point, there wasn’t any drainage going on, and the smell had me running to my truck and grabbing my surveying equipment.


When the turf tiles were removed, I noticed trenches that had been cut into the asphalt. The last contractor saw-cut trenches in the asphalt, excavated it, removed 8 inches of soil, then replaced it with ¾” rock aggregate thinking it would help with drainage.
I shot the existing elevations and realized the entire boarding area had minimal slope which was the reason for the sludge and slurry build-up.


I sat with the owner and hand-sketched a drawing/design (above) that I felt was needed for the entire area. Unfortunately, the areas did not have enough slope for proper flushing of the synthetic turf. I recommended that she slope the entire area back toward the building and into a channel drain. This design would include a new channel drain, newly placed concrete, concrete densifier, composite nailer boards, AirDrain grid, Envirofill, and TurFresh enzyme. Luckily, there was an existing drain that was part of an old site plan that we were able to locate and use. A contractor was chosen, and off to the races we went.


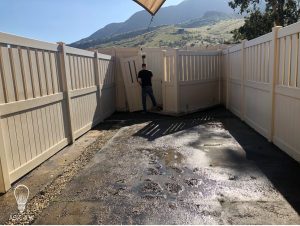
After the sludge and slurry was all scraped off the asphalt, string lines were set to new elevations. The new elevations caused the removal of the asphalt to achieve a 6” thick concrete pour. This worked out great since we were now able to remove all the concrete curbing that was contributing to the drainage problems.

The contractor aggressively worked on removing the asphalt and prepared the sub-base for the newly placed concrete.


Luckily, an old site plan showed an exit drain that we were able to uncover. Snaking the existing drain and running a water test was crucial in making sure the drainpipe was clear.


A commercial channel drain was installed for the removal of all liquids and to allow the employees to “flush” the areas for cleaning. I recommended that the contractor remove the top grates of the channel drain after the concrete cured so that dog hair would not clog the drain.


New concrete was installed, sloping all areas to the channel drain.


It is crucial to apply a “burn” finish to the concrete’s surface. Burnishing (or “burning” for slang) the concrete’s surface while finishing makes the surface very smooth and slick. This smooth surface allows liquids such as urine, water, cleaners, and more to slide on the surface to the exit drain without issue. Placing the concrete densifier will further benefit this movement.

I recommend placing a concrete densifier to the concrete’s surface as a curing agent. Concrete densifiers are permanent sealers that protect the concrete’s surface from damage caused by chemicals and contaminants that penetrate and cause deterioration. Liquid concrete densifiers (or hardeners) create a chemical reaction when penetrating the concrete’s pores. Densifiers grow new crystals in the concrete’s pores and make the surface hard. This provides a dense, smooth surface that will act as a lubricant, allowing pet urine and feces to exit without bonding to the concrete’s surface. Why is this important? Well, if pet urine and feces are not removed from below the turf, it will cause odor and a dangerous buildup of bacteria. I recommend Ashford Formula. I have used Ashford Formula for decades, and it has been the leader in concrete densifiers.

Synthetic Grass Warehouse has many “cut-view” CAD drawings that will assist you in all types of installations. We have CAD details for turf on concrete, asphalt, and rooftops. The one pictured above is similar to the project we completed in Agoura Hills, California. If you have questions regarding CAD drawings or installations systems, please give me a shout. I love helping everyone.
Installing Nailer Board with Airdrain


I recommend using a 1” thick plastic poly/composite nailer board for securing all exterior turf edges. Do not use wood for nailer boards. Wood dries up and cracks over time. SGW Polyboard comes in 1″ x 4″ x 20′. It can be cut down to any length to be laid flat when used for concrete, asphalt, balconies, mezzanines, and rooftops installations. This 1” thick material works great for incorporating AirDrain. Polyboard is a remarkable alternative to today’s synthetic turf nailer board products. SGW Polyboard can be drilled into without splitting and cut without splintering.


Tools needed to secure polyboard laid flat to concrete, asphalt, balconies, mezzanines, and rooftop surfaces:
✓ SGW POLYBOARD
✓ CHALKLINE
✓ DRILL & 3/8” bit
✓ ELECTRIC
✓ SUPERSEAM PRO 444
✓ STAPLE GUN/PLENTY OF ¼” x 1” CROWN STAPLES
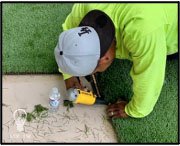
- Mark out the exterior edge of the desired area to be installed.
- Take a chalk line, and snap the exterior edge onto the surface.
 Cut the nailer board to length to fit the exterior edge, with the nailer board sitting on the inside edge of the chalk line. Place the nailer board flat on the chalk line to ensure all sections are cut correctly.
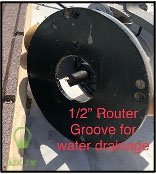
- When all the exterior nailer boards are cut into place, now is the time to cut openings for the escape of water and fluids if needed. Some installations may not need the escapechannels. An electric router works fast and clean! I recommend placing channels/holes at 3 to 6 inches on center to allow water and fluids to escape out and from under the installation.
- Prior to adhering the nailer board to the surface, I recommend drilling 3/8” holes every 12 inches on center to allow the adhesive to escape during compression. This will lock in the two surfaces for a strong bond.You cannot drill or nail nailer boards to rooftops, balconies, and mezzanine surfaces. This will damage the surface and may cause the surface to leak below.When securing the nailer board to these types of surfaces, I recommend placing Superseam adhesive between the nailer board and the surface you are adhering. Superseam adhesives are the strongest in the industry and will bond to most surfaces, including concrete and asphalt. Make sure the surface is clean of all dirt and debris. Remember, the system will not be completely secure until infill placement is completed. Respect wind lift in all areas.
 When securing nailer boards flat on concrete or asphalt, I recommend drilling and securing with a tapered head concrete anchor or Red Head. Using Superseam adhesives along with anchors will ensure a strong bond, which will assist in thermal expansion.
- When the nailer boards are secure and in place, it is the start of the AirDrain placement.
- When the nailer board and AirDrain installation are complete, place the synthetic turf over the AirDrain.
 Overlap and tuck the turf to the outside 1 inch of the nailerboard and staple every 2 inches on center. Make sure you keep the turf stretched tightly.
Airdrain Geocell Drainage Grid Instructions


(1) AirDrain pallet covers approximately 798sqft.AirDrain works great over concrete, asphalt, or rooftops. It is a great solution for commercial kennels, pet day care centers, and residences. If you have kennels that need to be installed over concrete flooring, it provides the ultimate in odor control and drainage. AirDrain separates the artificial grass from the concrete and directs the waste to a predetermined drainage area, reducing odors and preventing buildup of possible bacteria.
Proper Sequencing and Orientation of Panels for Rapid Installation
All installations must start in the top left corner of the field and work left to right in order to be installed properly.
Orientate the AirDrain GeoCell materials with the integral indicator tab to the panel’s bottom left corner (painted yellow). Install the AirDrain units by placing units with the connectors and platforms up, creating a flat surface for the profile above. If the male connectors do not fall or drop into the female connectors, then the orientation is incorrect.


AirDrain grids are very easy to install as long as you keep the YELLOW tabs to the bottom left… it’s that easy.

As you can see, we removed the top grates from the channel drain prior to placing the AirDrain grid so that the opening can withstand an overload of flushing.
When the AirDrain grids are installed and secure, clean off any debris on the surface and under the grids prior to installing the Pet Turf.


When placing 100% permeable Pet Turf synthetic turf on top of AirDrain over concrete, it is crucial for the turf to be kicked/stretched tightly and secured.
Placing infill bags on top of sections of turf will prevent the turf from moving, especially if it is hot outside.
I recommend placing Superseam Pro 444 adhesive along with ¼” crown staples to secure the turf to the nailerboard.
Ballast is Crucial!

It is so important to ballast synthetic turf when it is placed on AirDrain, especially over concrete. The turf will move due to thermal expansion and contraction. When this happens, wrinkles will appear. It is a chore coming back, getting it all stretched, trimmed, and ballast again due to your team not placing the correct amount of infill.
I recommend placing antimicrobial infill to complete the pet turf system. Using antimicrobial granules prevents urine and feces from bond to its surface. Using raw silica or any other granules may cause bacteria to bond, and the odors may not go away.


Why Does Pet Urine Smell?
Dog urine is a concoction of ammonia, bacteria, hormones, and uric acid. As the urine breaks down, the ammonia concentration increases and then mercaptans (extreme odors) are produced. This is the same chemical compound that gives skunk spray its long-lasting funk. Uric acid contains crystals that are left behind even after the urine has dried. These crystals are reactivated anytime new moisture reaches the area, including humidity or rainfall. A dog’s urine also acts as a scent marker designed to let other animals know this territory is taken. This potent combination gives dog urine its staying power long after the spot has dried and is the reason specialized dog urine cleaners are so indispensable. If you need assistance on how to combat the smell in synthetic turf, please give me a shout and I will get you set up.


Drainage and Aeration are the Key to Every Succesful Pet Turf Installation
ynthetic turf is merely a plastic. It is very easy to keep clean and maintain as long as you have drainage and aeration. When installing commercial facilities, it is important to create allowable space between the synthetic turf and surfaces which harbor bacteria.
JW
I look forward to seeing you next month where l will teach you how to combat hard water deposits on synthetic turf fibers!

For more information regarding cutting around playground poles or would like to schedule a training or webinar, please contact J.W.: askjw@sgwcorp.com or call 888.846.3598
Suggestions for the use of ASK JW installation techniques are solely at the end users’ discretion; however, the user should determine suitability for the intended use by his/her own evaluation. Because the use of the materials is beyond our control, neither ASK JW nor SGW shall be liable for the outcome of any use of said materials including any injury, loss, or damage, direct or consequential, arising out of the use or inability to use these techniques and products.


