


Most creases/lines in putting green materials are mainly at the edge of a roll. During manufacturing, the roll is tightly wound for packaging. When the finished product is “machine rolled,” the edge is attached to a cardboard core/tube, pushing it into the face of the putting green surface. This leaves a “crease/line.” When the rest of the roll is tightly rolled to completion, it mashes the edge that was connected to the cardboard core/tube roll. This also could be from rolls stacked on top of one another. Some crease lines may end up more into the roll. As frustrating this can be, with a little patience the crease/line can be removed.
There are many factors to consider when dealing with any imperfection in the turf surface. The crucial factor is that one must not think defibrillation is the key to making them disappear. Defibrillation (power brooming) scratches the fibers. Over power brooming and aggressively brushing turf fibers will change the dynamics of how light reflects upon them. If you scrub an imperfection in synthetic turf, it may become a “darker” color than the rest of the areas. This is due to the sunlight being halted from reflecting off the shiny blade.

Most turf manufacturers may warranty “roll creases.” I recommend inspecting “all types” of synthetic turf prior to rolling it out. Below is a checklist I recommend performing to prevent defects/damages in your turf installations.s.

- When picking up or having your turf delivered, check the outside of the roll for any damage. “Forklift burns” are common in landscape and putting green turf. They create holes in material. This is due to the operator/forklift driving the forks rapidly into the base of the roll. When the forks are hot and slide under the roll, they tear into the roll causing damage.
- Roll the putting green out and check the entire surface and backing for any defects, imperfections, and damage.
- Immediately contact your turf manufacturer’s representative and discuss the damages. It is best to take photos marked with the date and time to show proof of damage. Do not take the chance with a crease! It is not fair to completely install the turf knowing you have a crease, and then ask your manufacturer to pay you to remove and replace it. Catch the crease before relationships are affected.
- If the issue is only a “roll crease,” you may be able to fix it and make it disappear. Either way, take photos for your files and create a plan of attack to either replace it or make the crease go away.
If you have decided to remove the crease and complete the installation, you will need to understand that if the crease remains visible, you may get slack from the client/homeowner, and the entire installation may have to be removed.
Raised Creases
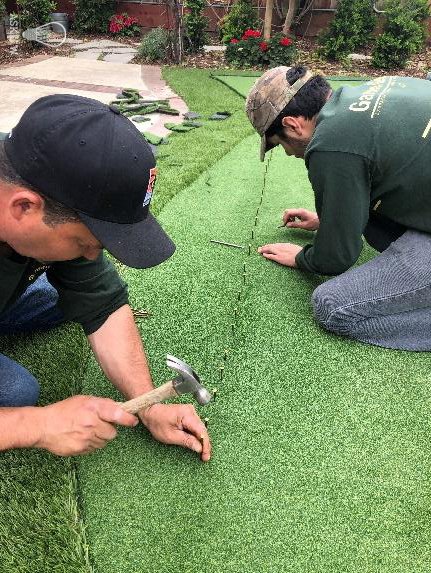
If you have a “raised crease,” I recommend temporarily placing small common nails down the center of the crease – drawing it down until it’s smooth and leveled.
Working In The Infill


Once the crease is flat, smooth, and leveled from each side, place the infill into the crease, and slowly pick into the fibers pulling vertically until the infill drops to the base of the crease. This will ensure the crease will have ballast and remain flat.
JW Camouflage Trick


After the crease is infilled and flat, I recommend placing additional infill and use the “JW scribing” method. This method integrates the fibers within the infill and camouflages the crease.
Use a drop spreader and top-dress the crease approximately 1 foot on each side. Using a 4” to 6” turf nail, take the pointed end and scribe the surface of the putting green in the pattern shown above center. This method will integrate the infill into the fibers and camouflage the crease. This works great for seams as well.


When the crease is scribed and the fibers are integrated, a power broom can be used to even the infill out. Be careful not to over-scrub the crease line. This may cause a difference in color, which I spoke about earlier. A small carpet brush can also assist in integrating the fibers.
For creases that are “concave” and/or depressed, I recommend doing the same method above, but you will need to place the embeds (temporary small nails) outside the crease line to level out the crease. Then, follow the infilling steps above.

Power brooming is crucial to camouflaging creases. It must be done throughout the entire putting green surface, or you will see where you manipulated the fibers and where you did not. This means that you may need to top-dress the entire putting green to match.
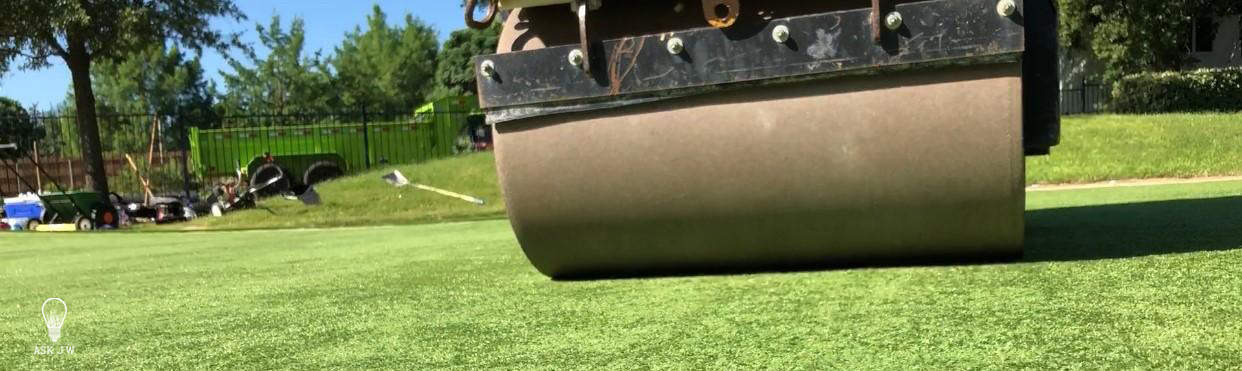
Rolling putting greens after they have been properly infilled will help with taking care of visible creases, plus it allows the surface to play a good 11 on the stimpmeter.
“I look forward to seeing you next month where I will be talking about “Ballast” and how it gives longevity to your turf system.”


For more information regarding head seams or would like to schedule a training or webinar, please contact J.W. at askjw@sgwcorp.com or call (888) 846-3598.
Suggestions for the use of ASK JW installation techniques are solely at the end users’ discretion; however, the user should determine suitability for the intended use by his/her own evaluation. Because the use of the materials is beyond our control, neither ASK JW nor SGW shall be liable for the outcome of any use of said materials, including any injury, loss, or damage, direct or consequential, arising out of the use or inability to use these techniques and products.


