
In the past decades, putting green surfaces have become a favorite addition to the yards of homeowners. Families are leaving the tv, going outside, and getting more involved with the newest yard games. Lawn Darts, Cornhole, and Putting Greens seem to be the latest craze
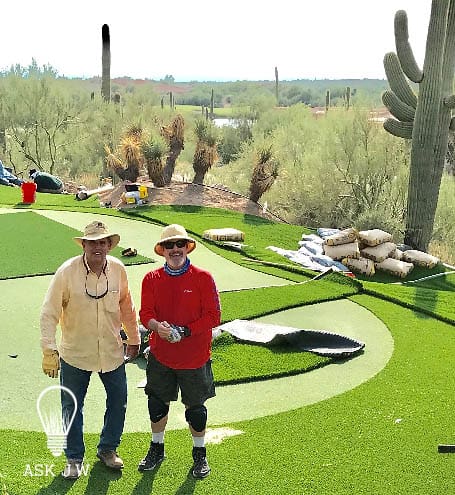
Installing putting greens can be a challenge, so I hope you enjoy these installation procedures and methods I have written to assist you in your installations.
If you have any questions, always feel free to call me toll-free at (888)846-3598.
JW

Location of Putting Green Area
It is beneficial to have a schematic or a sketch of the proposed putting green and its location on the project. Having a proposed drawing will allow the installation process to be more efficient, especially when it comes to the hole placement. If possible, I recommend placing the putting green in an area that is away from excessive vegetation. This will prevent weekly maintenance on the putting greens surface which can interrupt the play of the golf ball.
Step 1: Removal of Existing Natural Grass
If the area that you are installing your synthetic turf putting green is in an area that has an existing natural grass lawn, you will need to remove all existing grass prior to placement. For larger projects, I recommend using a sod cutter machine to be productive.

Prevention of Re-growth (Optional)
Pre-Emergent is a granular herbicide that prevents seeds from growing underneath your turf. Although it will not stop a rooted plant from growing, the Pre-Emergent will prevent all types of grass growths. Apply the Pre-Emergent before any base material and before the install process.
“It’s not cool having your client pull weeds for the life of the putting green”.
JW

Step 2 – Reconstructing of Existing Irrigation
Once the grass and soils are removed, I recommend inspecting all irrigation that is needed within and around the surrounding synthetic turf area. I strongly recommend removing all existing irrigation lines that are underneath the synthetic turf. I have witnessed irrigation leaks after the turf was installed and the entire area had to be pulled up, re-graded and placed back down due to a turf nail that had pierced an irrigation line beneath the turf. When irrigation lines are beneath the synthetic turf there is always a chance that a driven nail will cause it to leak sooner or later, don’t chance this costly mistake. I DO NOT recommend “capping” sprinkler heads. I recommend either removing the existing grass valve completely or placing a “cap” on the irrigation valve at the irrigation box. I have seen contractors cut the wires to the valve thinking it will cut off all water to the area. However, they come to find out that a maintenance landscaper reconnected the wires not knowing the valve was supposed to be cut off, and then the entire synthetic turf area was flooded. Many times there are trees or plants that will remain in the middle of the area to be turfed. I recommend placing a drip system with a poly tubing directed to the tree or plant areas. This will lower the chance of a leak and the new irrigation line can be excavated below the subgrade to prevent a nail from damaging the line.
Inspection of Subgrade Materials
Inspecting the subgrade soils below the surface of the synthetic turf you are installing is very important. If the soils are clay-like or have no permeation properties then you will need to excavate and remove the soils and replace it with a good mixture of sand and aggregate to allow for proper water drainage.

Grading and compaction of subgrade materials are very important for the outcome of how smooth the ball rolls. Drainage materials consist of clean rock and sand. I recommend using limestone chat, decomposed granite, or any imported materials that have permeable qualities.
When the grading is complete, the underlying surface should be equally smooth without any compactor lines or small holes. If the subgrade materials are not smooth, the golfer will complain about irregular “ball roll”. It is especially important that the area around the putting green cup be consistent.
If you are going to use type II or road base as your grading materials, I recommend placing 1 inch of chat or decomposed granite on top and compact to complete a smooth surface. Type II and road base has too much aggregate (rock) and will cause problems with proper “ball roll”.


Step 3 – Grading and Compaction of Drainage Materials
Once you have removed all existing grass and soils, smooth out the existing area to receive imported drainage materials. Place the imported drainage materials to the design and shape of your putting green. Once the area is graded, evenly spray down the surface with water and allow the water to soak into the graded materials – wait 30 minutes prior to compacting. I recommend using a plate compactor machine and compact imported fill to a minimum of 80%. This mechanical compactor is a must for all synthetic turf installations. If the subgrade is not properly compacted you will have a settlement of the subgrade soils and will have to remove the turf and redo the grading. You can rent mechanical compactors from most rental facilities. I recommend using a hand tamper for all edges that a mechanical plate compactor cannot reach.

After the grading is complete I recommend spreading small amounts of silica sand on the surface where small voids are present. Take a water hose and slowly drag it across the surface, leveling out the silica sand to fill all small voids.
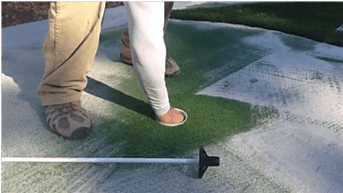
Step 4 – Putting Green Cup Placement


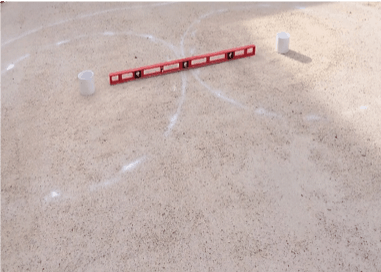
When the grading and compaction of the subgrade materials are complete, take a level and check the 3’ radius around where the cup is to be placed to make sure it is flat without any imperfections. It is very important that the 3’ radius around the putting green cup is flat, smooth, and true. This where the golf ball will need your grading talents to simulate real play without the golf ball stopping or curving away from the hole due to improper grading.
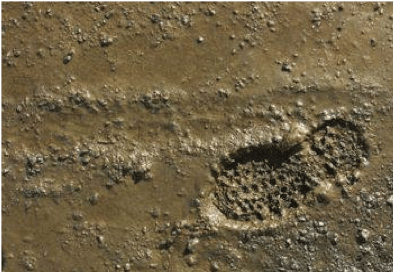
Many synthetic turf contractors place the putting green cups in dirt and compact around the cup. I highly recommend placing putting green cups in concrete. When placing putting green cups in compacted dirt the cups tend to shift due to loosening of the soils caused by rainwater, foot traffic, and excessive pulling the flag in and out of the cup. When the putting green cup is not stable it will allow the cup to move or settle which causes the flags to tilt and/or cause the “volcano effect” (picture to the upper right). If this happens you will definitely be called back to remove and replace entire green.
Depending on the cup size, it is my recommendation that the excavation of the hole for embedding the cup should be a minimum of 2” around the exterior of the diameter of the cup. This will allow for the poured and placed concrete to wrap around the entire cup. The hole should be excavated 1” deeper than the putting green cup height. When excavating the cup hole, I recommend placing weed barrier or a plastic bag to put the excavated soils on. This will prevent the excavated soils from disturbing the compacted subgrade surface.
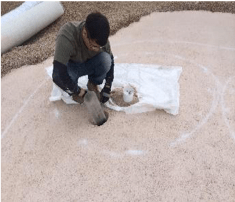
Below are two methods I recommend for creating a successful putting green cup installation.


Creating a film on the putting green cup and placing concrete around its perimeter will create a concrete cylinder which will allow the cup to rotate for height adjustment.
I recommend two options for creating a film around the putting green cup. I recommend WD40 or Wax Paper to create a lubricated surface to allow the exterior putting green cup to be able to slide up and down after the poured and placed concrete cured.
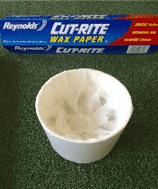
WAX PAPER– Take the putting green cup and place wax paper around its surface tightly.
WD40– Take the putting green cup and spray the complete surface with WD40/Silicone Lubricant.
Watch the youtuve video above to view my instructional video on putting green cup installations


Use a torpedo or 4’level and constantly check the elevation and levelness.
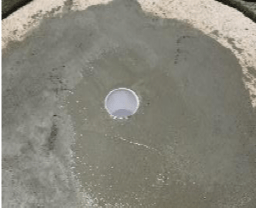
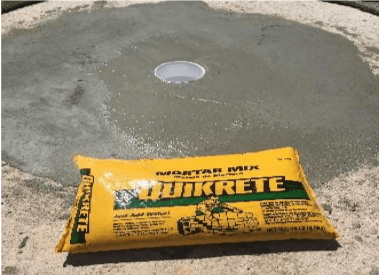
Take a round pool trowel or mason trowel and smooth out the surface evenly with the compacted finish grade. Place 1/8” of concrete mortar cream approximately 18” on top of the compacted subgrade around the entire cup. This will create a flat smooth surface to prevent ball stoppage and any irregularity around the putting green cup.
Depending on the outside temperature, carefully spin the cup every 5-10 minutes until the concrete has fully cured. This will create a concrete cylinder that will allow the cup to spin and raise to the proper elevation at the putting green’s surface. It will also allow you to replace the cup if it is ever damaged.
Step 5 – Installing Weed Barrier
If the installation requires grass removal it is important to use a quality weed barrier. This will prevent any future vegetation and weeds coming through the drainage holes. It is important to cut all weed barrier close to all edges. The edges are the most predominant areas where weeds like to pop back up. When installing a weed barrier, overlap the sections at a minimum of 6 inches and use staples to secure.
Optional- Installing a Gopher Screen
In some parts of the country, gophers are digging up and through the synthetic turf. This is very costly to patch and many times the entire area must be removed and entirely replaced with new turf. Gopher screen is a wire mesh barrier that is laid on top of the subgrade prior to placing the compacted materials. Overlap a minimum of 6 inches and secure with staples.
Step 6 – Exterior Lay Out


After 20+ years of installing putting greens, I have created an easy method to ensure the exterior radius of every curve cosmetically compliments the overall design of the putting green.
The outside dimension that you require will start from each cup. Using an upside-down marking paint and a tape measure, hook the end of the tape measure to each putting green cup and paint the desired radius to your outside layout. After the radius marks are painted, connect each radius to your exterior design. This will ensure that all of your outside radii will be true and smooth without any sharp angles.
Step 7 – Placement of the Synthetic Putting Green
 Roll out the synthetic putting green on the prepared area and let it sit in direct sunlight for at least an hour. This will allow the synthetic turf to conform to the undulations of the surface.
Once the putting green material has conformed to the surface in its location, secure and stretch our any wrinkles so the entire surface is smooth and tight. I recommend driving temporary nails at one end, stretch it, and place temporary nails at the other end until the putting cups are cut out, the exterior edges are completely nailed.


Step 8 – Cutting Putting Green Cup Holes
Take a sharp knife and cut out the putting green material – cut as close to the hole as possible. I recommend circling around the cup as you cut. This will ensure that the cut is made precisely. Once the piece of turf is cut out, I recommend placing it back into the cups hole to prevent infill sand getting to the bottom when the infill process is complete. The excess infill can be removed easily by a shop-vac vacuum.

Step 9 – Marking of the Exterior Putting Green Design
Following the design that you have created can be difficult if you don’t have the right tools or method. The roll of putting green material that was placed onto the compacted surface will, unfortunately, cover the previously painted layout. You will have to remark the exterior lay out onto the surface of the putting green material. I recommend using children’s sidewalk chalk to mark the exterior shape. The chalk creates a visible mark that can easily be brushed off and serves as a center line when cutting the design into shape.

When marking the exterior putting green I recommend using the same method as you did when painting out the exterior design on the compacted surface. Hook the end of a tape measure to each putting green cup and chalk the desired radius to your outside layout. After the radius marks are chalked out, connect each radius to your exterior design. This will ensure that all of your outside radii will be true and smooth without any sharp angles. The picture above shows that you can adjust the markings to make the design larger or smaller. The markings that you do not want to keep can be easily brushed off.

Step 10 – Cutting the Perimeter of the Putting Green Material


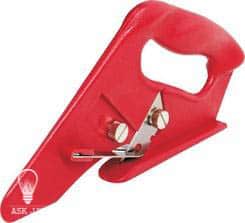 I highly recommend using a push cutter tool when cutting the exterior marked line. The push cutter blade cuts from the bottom of the turf (the backing) without cutting the top fibers. Make sure you change out the blade every 20’ feet for fast smooth cutting. Grab the putting green material firmly and position the push cutter with the material in the opening of the push cutter. Push the cutter to the marked line and follow the marked chalk line. Pull out the push cutter often to clean the blade of excess cut fibers.

Step 11 – Securing the Putting Green Material Without Fringe

However, I do not recommend not encasing your putting green without fringe, due to the fact that the ball is able to over-run the putting surface. JW
If the putting green is not designed with an exterior fringe, the edge of the putting green material should be secured with 3” galvanized finishing nails. I recommend 3” galvanized finishing nails for 3 reasons.
- The nail heads are small and can be hidden within the fibers.
- The nail heads have a concave “barrel head” which allows you to drive the nail down to the base of the backing without hitting the fibers with the head of the hammer.
- The nail is galvanized and will not rust. This will prevent rust color from migrating up and onto the surface of the putting green.
I recommend placing the nails every 3-4 inches on center and ½ inch from the edge.

Installation of Fringe
“Fringe” is the exterior collar of grass that is slightly higher than that of the putting green material. The fringe wraps around the edge of the putting green surface and prevents the golf ball from rolling off the putting green surface. The fringe also gives the putting green a beautiful look with its two different styles of grasses.
When designing your putting green with exterior fringe, the layout is crucial. Exterior fringe causes a lot of waste. It is important that the fibers and direction of the synthetic turf MUST go the same direction or there will be a difference in color due to the reflection of light off the fibers.
I recommend using large sections of synthetic turf for your fringe. If you use small pieces to save money you will create many seams. Continuous play on the putting green will cause the seams to eventually be visible due to the fibers being separated by foot traffic. If you think you are saving money by using scrap turf to piece together the fringe, you’re wrong and will end up spending more time, labor, and money doing so.

Step 12 – Placement of the Exterior Fringe
All synthetic turf is manufactured in rolls just like carpet. When measuring the fringe that is needed, it is important that you understand the synthetic turf layout and direction of the turf itself.

When doing your layout, it is best to have all the “gauges” running the same way. The “gauges” are the rows of the stitch pattern that are present on the backing of the synthetic turf. When you place two sections of turf together with the “gauges” running in different directions you will see a difference in overall color.

Lay the sections of fringe material on the surface overlapping the putting green material. Secure the fringe by placing nails down the middle of the fringe to ensure there is no movement. Make sure to spread the fibers when driving the nail to the base of the turf – this will prevent trapping of the fibers.

Lay the sections of fringe material on the surface overlapping the putting green material. Secure the fringe by placing nails down the middle of the fringe to ensure there is no movement. Make sure to spread the fibers when driving the nail to the base of the turf – this will prevent trapping of the fibers.

Lay the sections of fringe material on the surface overlapping the putting green material. Secure the fringe by placing nails down the middle of the fringe to ensure there is no movement. Make sure to spread the fibers when driving the nail to the base of the turf – this will prevent trapping of the fibers.

When the exterior of the fringe is cut and secured with nails, precisely cut the edge of the fringe to the putting green material. If there are any gaps between the putting green surface and the fringe, it will predominantly show after the infill is placed.

Step 13 – Applying Seam Tape and Adhesive for the Seams

After the fringe material is cut into place, I recommend placing seam tape and adhesive to all seams. I understand it’s easier to nail the seams instead of using seam tape and adhesive, but if you want a job done right and to last throughout your warranty, this is what I recommend. Carefully place the putting green material and fringe material on top of the seam tape and adhesive and secure it by placing a 50lb bag of weight for compression. Check periodically to ensure that the adhesive does not seep up and through the seam.

If your project is large and requires seaming two sections of putting green material, I recommend using the Superseam Putting Green Tool to integrate them together.
Learn more about this tool and more seaming techniques at the link listed below.
(Optional) Securing Seam Without Seam Tape and Adhesive
I DO NOT RECOMMEND IT… but if you make the choice to not use seaming tape and adhesive, I recommend securing the putting green material by using 3” galvanized finishing nails. As I mentioned above, I recommend 3” galvanized finishing nails for 3 reasons.
The nail heads are small and can be hidden within the fibers
The nail heads have a concave “barrel head” which allows you to drive the nail down to the base of the backing without hitting the fibers with the head of the hammer.
The nail is galvanized and will not rust. This will prevent the rust color from migrating up and onto the surface of the putting green
I recommend placing the nails every 3-4 inches on center and ½ inch from the edge.

I recommend using a nail that has a small head. Using a nail head larger than 3/8” will trap the fibers and allow excess infill to fill its void which makes it visible to the naked eye. My recommendation is to use 16d 3 ½” coated common framing nails.
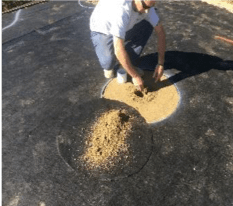
Step 14 – Infill Placement

When the entire putting green is secured into place, I recommend brushing up the fibers prior to placing infill. Foot traffic may have depressed the fibers during the initial installation. This will allow the infill to drop to the base of the turf without trapping the fibers.

When placing the infill on the putting green surface, I recommend the manufacturers specifications on how many pounds of infill per square foot the product requires.
I recommend using a Scotts Classic drop spreader to evenly place the infill sand – it is adjustable and is affordable.

If you don’t already own a TurfBrush attachment for the Scotts Classic drop spreader you may want to go out and purchase one. The TurfBrush brushes in the infill all in one pass – no brooming or raking.
When dropping infill sand into your putting green, it is very important NOT to place too much at one time. The objective is to fill up the voids

between the fibers from the bottom to the top. If too much is placed, not only will it trap the fibers, but it will cause an uneven surface for the ball to roll on. I recommend making passes with the drop spreader starting from East to West, then North to South. Crisscrossing the placement will ensure the infill will be placed evenly.

Repeat this until all of the calculated infill is placed and has reached the top of the surface where it is visible to the naked eye.
After every completed pass, you must use a stiff push broom and work the infill sand to the base of the putting green surface.

Repeat this until all of the calculated infill is placed and has reached the top of the surface where it is visible to the naked eye.
After every completed pass, you must use a stiff push broom and work the infill sand to the base of the putting green surface.

After the infill top layer of infill is in completed and the cups are cleaned out, use a water hose and evenly spray down the entire putting green surface. This will assist the infill to settle in place and bring out the putting green’s surface color.

For more information regarding putting green installations please contact
Ask JW at 888.846.3598


