


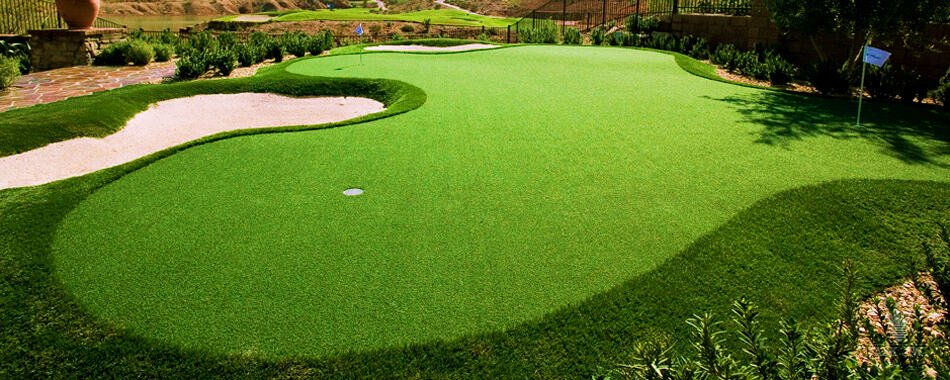
When I was in the installation business, I never sold a putting green that wasn’t exciting. Of course budget is a concern when it comes to synthetic turf putting greens and all they have to offer. Exciting designs brings value and beauty to putting greens. Adding Sand or Grass Traps to your putting green not only brings value and beauty to the overall appearance, but will help you overcome your performance issues on the real course… you know, the shots that you hack while watching the ball roll back down into the sand, lol.
This month ASK JW will go in depth of how to install Sand & Green Traps and what to look out for when installing them.
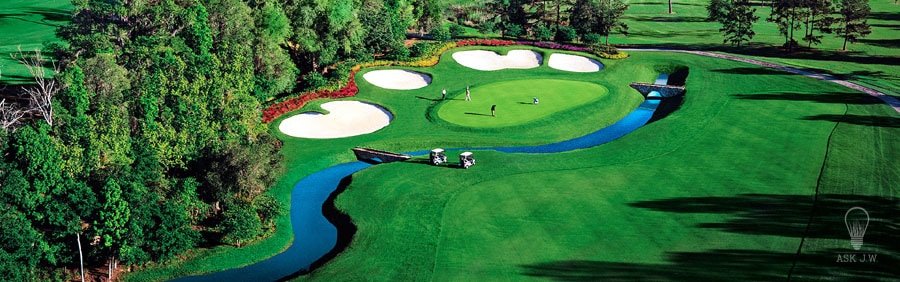
Synthetic Turf Putting Greens have evolved over the last decade. The Look, Durability, and Play of the surface have great simulating characteristics just like the ones on a real golf course. Professionals in the golfing industry have assisted turf manufacturers in the R&D of putting green materials, which have produced below;
- The backings are made stronger
- The fibers are more durable
- The specifications have become more dense
- The colors are more realistic


Surface Play and Stimpmeter Speeds
Synthetic turf putting green designs have become more sophisticated and challenging, which relies upon synthetic turf contractors being knowledgeable and taking pride in their craftsmanship especially when it comes to installing bunkers.

How many golfers out there practice putting and chip shots but are terrible at hitting out of trap/bunkers?
You may be able to wack the ball out of a trap/bunker on a real course but having a trap to practice at your own home will give you the advantage to not only get it ball out but place it as well.
What is a bunker?
A bunker is an area that is sunken/depressed down and below the surrounding elevation, and is often filled with sand. Bunkers are often called “sand traps” and are golf course hazards.

If you have chosen to install a sand or grass trap in a putting green I recommend meeting with your client regarding the design, installation and mishaps that may occur when and after the putting green is installed.
I recommend going over questions with the customer/client prior to spending time on a design that may be out of their budget. Putting green designs may vary in cost depending on the how much you want to spend? It is easy to incur costs when designing a really nice putting green, but as I tell clients….
“The quality will remain after the price is forgotten”… JW

Is the person that is playing on the surface a beginner, Avid or Professional golfer?
Before you tackle any synthetic turf putting green make sure that your experience at installing turf putting greens will satisfy the skill of your client.
If your installation crew has little to no experience installing putting greens, then I would not try to sell putting green installations until you and your team are trained and skilled to do so. I have seen many turf contractors trying to tackle putting greens and the very first one they contract ends up being a professional golfer. Not only does it give the customer a bad experience, but you probably will have to remove and replace the entire putting green due to the surface not simulating a real putting green surface.
I suggest doing your due diligence, research and educate your team until you are qualified and secure to undertake putting greens & traps.
Is the surface going to be used for performance enhancement?
As they say… “Practice makes Perfect”. Most golfers, beginner, avid and professional, purchase a putting green so that they can use it for practice.
This is why it is important to understand what it takes to install a quality putting green surface. The customer is relying upon your skill to give him a surface that will meet his or hers expectations. Understanding undulations and Stimpmeter speeds will help create the desired surface. If the surface is bumpy, slow, fast or doesn’t roll at all, it will be an ongoing problem for the end user.
Do they want a Sand Trap or a Grass Trap?
When designing a putting green you should ask the customer which one they will choose. This is when you will need to educate the customer the difference.
Sand traps vs. Grass traps? What is the difference?
Both sand and grass traps will need excavation and removal of soils to create a lower, sunken elevation. Sand traps are made with sand, and grass traps are made with synthetic turf (grass). Sand traps are more labor intensive and take skill to create. If they are not installed properly, not only will they look terrible but will become a nightmare to repair and/or replace.
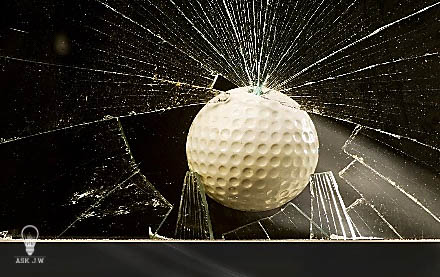
Do you have enough room for the ball to exit and land on the putting green surface?
Are there windows and structures that may be hit by a bad shot?
Is the player looking to experience short bunker shots rather than long ones?
(This will determine the size of the green itself.)
I have heard horror stories regarding golf balls breaking windows, making holes in stucco, flying into the neighbor’s yard, and even causing injury to bystanders. The location and size of the trap is very important to consider. If the area is small you may want to reconsider NOT installing a sand or grass trap. If the area is sufficient in size then you will need to make sure that the location is in a place where the above will not happen. If they are looking for long shots out of the bunker/trap then you may want to place the trap at the end of the putting green
Explain the pros and cons of sand or grass traps.
First off, one is sand and the other is mostly the same turf materials you are using for the fringe. Hitting out of a sand trap is totally different than hitting out of a grass trap. The grass trap is less forgiving and if you divot you will definitely hack your shot. The sand trap is forgiving but can get messy if you’re practicing all day. With every shot, sand is removed from the trap. I will talk about this below.
Are sand traps more expensive than grass traps?
Depending on the design, sand traps usually cost more. Some sand and grass traps are even in cost, depending on the price you pay for the turf that you are lining the grass trap with. Let us say you spend $4.00 per foot on the fringe grass and the trap is 100 square foot. That is $400.00 dollars just for the turf, not including the large waste you will incur. 100 square feet of sand will be much cheaper even at 1 foot deep. You will need to do a complete take-off of the materials and labor and decide for yourself if a sand trap is going to be more or less than a grass trap. Ultimately it will be up to the customer to decide on which they will want to go with.
What About Drainage?

Drainage is very crucial to sand and grass traps. You must use a leveling device when constructing traps. Water run-off can destroy a trap within minutes. If you need to place a French drain or an exit drain from the trap is is highly recommended.
Maintenance of Sand Traps
Sand traps will need to be kept clean and replenished as much as you play. When the sand gets down to the sub-base it is time to import more sand. Grass traps will need to be kept clean and brushed up to allow for a smooth ship shot. If the infill in grass traps get too low you will need to replenish so that the head of the golf club doesn’t drag. Sometimes the soils may shift in a larger sand traps, which may cause wrinkles. You may need nails or staples and flatten them out. Make sure you don’t trap the fibers with the nails heads. The infill may need to be vacuumed out to achieve a good embedment.
Design
Safety
It is important to think of safety when designing the location of the sand/grass trap. Having a golf ball accidentally fly into your face isn’t something I would want. I recommend placing traps where you have some type of insurance in case you hack it.

Design for Performance
Most the time shots out of bunkers are driven towards the hole. Placing the trap in accordance to the hole placements is very important.
I recommend designing and building sand/grass trap to “Your games need”. If you want to work on hitting the ball up and over a bunker wall, then you will need to design and excavate elevation change. If having a bunker is only to work on focusing on the motion of your swing and cutting through the sand, then I would build a simple bunker approximately 1 feet deep to allow for your feet to dig in.

When Grass Traps are deep and the slope is aggressive, I recommend placing bags (sand/infill) on top of the turf as you slide out the wrinkles while securing. Leave the bags laying on top until the surface conforms to the turf.
Creating the Internal-Edge

Depending on the budget and the needs of the customer, you will need to decide if you want to create a “Bullnose” edge or a “Smooth” transitioning edge. A “Bullnose edge takes the right materials, skill and craftsmanship to create. It will also be an added expense to your sand trap.
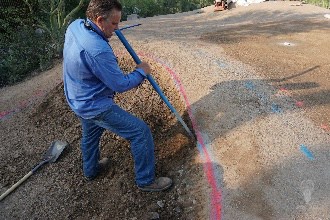
Preparation & Compaction Sloped Transitions

Ground preparation and compaction is crucial when installing putting green bunkers. If the soil is not stable, shifting may cause failures in the synthetic turf system. A mechanical compactor is a must when installing bunkers. It is important to understand moisture and density when compacting the transitions. Do not rely on the synthetic turf to stabilize sub-standard soils and/or installation.
A hand tamp is great for compacting and smoothing the walls of the sand/trap.
Excavation and Carving of “Bullnose Bunkers”
Make sure you call 811 or Call you before you dig when excavating more than 6 inches.


When the trap is in location and marked on the ground, excavate to the depth of your design. I recommend using some type of leveling equipment to ensure the proper excavated elevation.

When excavating, I recommend removing the excavated soils as you go so the the installation area is kept clean.
I recommend using a pry bar, one that has a flat chisel type end. It works great for carving the side walls of the bunker.
Make sure you keep your exterior bunker line painted so that you can fulfill the design.

When the exterior of the bunker is carved, take a mattock pick and complete the carving process by cleaning the edge to be ready to allow for the 4 inch flexible pipe that I will talk about soon.
Lowering & Leveling the Base of the Bunker

Lower & Leveling the base of the bunker is important. Not only allows the golfer not to be standing on a slope but by lowering it will prevent the golfer from digging too far into the sand and hitting the geo-textile.

A 4 foot level works great for leveling the base of the bunker.

Once the bunker is excavated, carved, leveled and compacted it is time to install the Geo-textile fabric.
Placing Geotextile Fabric & Creating a “Bullnose”
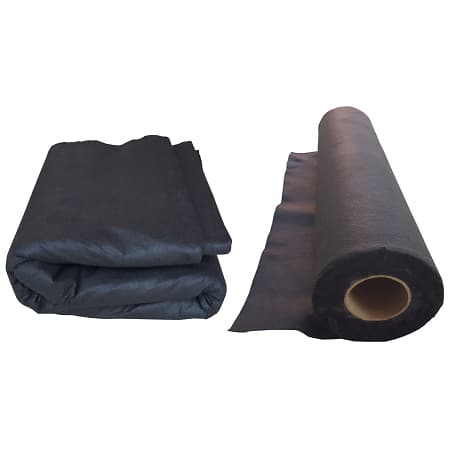

Geotextile fabric is a high strength permeable fabric. I recommend lining the bunker with a high quality geotextile fabric to give the entire system stability. It keeps underlying vegetation from growing through and provides a clean containment for the bunker sand.
I recommend placing the geotextile prior to installing the 4 inch flexible pipe which we will talk about later regarding the “Bullnose”.
If you are needing to install more than one section of geotextile, overlap at least 3 feet. This will add to the stability and prevent sand from working its way under the geotextile. It is very important to roll out the geotextile farther than the bunker-line so that you can roll it over the flexible pipe and tuck it which we will talk about later.
I recommend placing galvanized washers on 5-6 inch turf nails and securing the geotextile fabric.
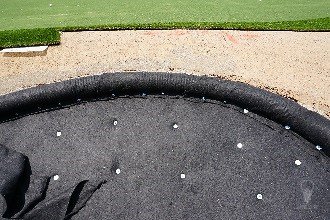
Installing Flexible Drainage Pipe & Creating the “Bullnose”
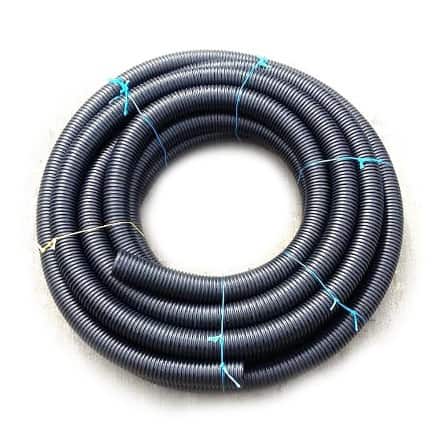
Flexible drainage pipe works great for creating the “bullnose look”. It also stabilizes the bunkers edge when tucking and wrapping the synthetic turf around it.
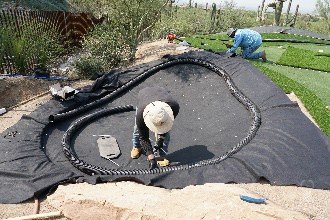
When the geotextile is in place, start installing the 4 inch flexible pipe up tightly against the carved out bunker edge.

Secure with large galvanized spikes every 6 inches minimum on the top and 1 foot on center into the bunkers edge.

When the flexible pipe (Bullnose) is secured, fold over the excess geotextile that you allowed to run over the bunker-line and tuck it under the flexible pipe tightly and secure with 5-6 inch nails with galvanized washers.
When the flexible pipe (Bullnose) is secured, fold over the excess geotextile that you allowed to run over the bunker-line and tuck it under the flexible pipe tightly and secure with 5-6 inch nails with galvanized washers.
Backfilling & Compaction


When the bullnose is secure and completed you may have to backfill and compact soils outside the newly installed bullnose. Sometimes gaps and voids occur when installing the flexible pipe. You may need to get a small bucket of 3/8 minus and fill these gaps and voids, introduce water and compact with a small tool. You do not want any settlement at the bullnose line.
Placement of Turf


“Prepare to have lots of waste”…. Ask JW
When designing your bunker, make sure you do a complete lay-out of the sections of turf on the diagram. This will not only prevent you from failing to figure on extensive waste but will allow the crew to understand where the seam section lay-out and seams will be.
When installing the turf in and around the bunker, make sure you do not try to rotate the sections to save on waste. The fibers MUST be going in the correct same direction.
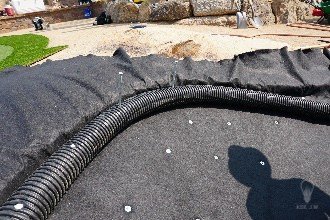
Tucking and Securing the “Bullnose”


I recommend using a flat nosed tool that can tuck the turf tightly up and under the flexible pipe. (You may have to place duct tape on the edge if it is too sharp so that it will not damage or create injury).While placing tension, secure with synthetic turf nails every 3 inches on center working around the entire bunker until you have reached the starting point. Seam tape and adhesive all seams.


When the synthetic turf is installed and the bullnose is secure, I recommend trimming the excess turf approximately 3 inches from end of tucked turf. This will allow for thermal contraction and will give you room in case you need to place more nails and secure.
With skill and craftsmanship a bullnose Bunker can look amazing!
Placement of Bunker Sand


Not all bunker sand is the same quality. Many contractors place the wrong type of sand which will just have to be removed and replaced with the correct one. Make sure your team understands the difference. I recommend using a premium bunker sand that is soft, light and fluffy in feel. You may need to contact a golf course to find out the locations of an area near you that sells bunker sand. You DO NOT want to use silica sand. Silica sand is abrasive, compacts and gets hard when it gets wet and does not simulate real bunker performance. Remember to clean up the entire area prior to placing bunker sand. You don’t want to contaminate the bunker sand with turf fibers that have been left over from cutting. Place the bunker sand in lifts no more than 6 inches. If you place too much at one time while you are walking on it, you will compact and create deep foot holes which will create inconsistency. This could affect the golfer’s performance.
When the synthetic turf is installed and the bullnose is secure, I recommend trimming the excess turf approximately 3 inches from end of tucked turf. This will allow for thermal contraction and will give you room in case you need to place more nails and secure.
With skill and craftsmanship a bullnose Bunker can look amazing!
“To be the best at synthetic turf bunkers it takes research, craftsmanship and listening to your clients’ needs and execute them”.
Ask JW


