

Part 1- Over the years, synthetic turf putting greens succumb to wear and tear which reduces the longevity of the surface. Most of these surfaces will become wrinkled, bumpy, and all but impossible to maintain, especially when it comes to Stimpmeter speeds. The biggest cause of putting green failures often begins with inexperienced installers. Getting to know your putting green materials is the first step. You don’t have to be a professional golfer to install a synthetic turf putting green, but you must learn how to install them correctly. Many installers feel that since they have conquered landscape turf, installing putting greens couldn’t be that difficult. However, they would be wrong. Perfecting synthetic turf putting greens will always be an ongoing learning experience due to the fact that every golfer and every putting green installation is different than the next. In my 25+ years of installing synthetic turf putting greens, I have learned that you must have skills, patience, and knowledge of the game of golf to effectively install a putting green. I know that that sounds a little drastic, but if you want to be the best in what you do, you must put effort into researching, learning, and practicing being the best. It may sound like I am wanting installers to become golfers, but that’s not my intention (although it would help). My goal is to teach installation tips that will save your team frustration when the client is very unhappy with their newly placed putting green. It happens, and it will keep on happening if your team is not properly educated. I am very excited to assist you and your team and to bring awareness to the pros and cons of installing synthetic turf putting greens. And who knows? You may pick up golf or become a better golfer.
This month, ASK JW will start a new series which will provide educational information along with tips and tricks for perfecting putting green surfaces.
“Drive For Show, Putt For Dough”
Golfers rely on a good putting surface to allow them to practice and become better at putting. That’s why understanding putting fundamentals is key to becoming successful at installing putting greens. This doesn’t mean you have to give your entire installation team lessons on golf, but you must understand the golfer’s needs and perspective when they are wanting a putting green installed in their backyard. Being a better golfer means consistently putting at your highest level. For the highest level to be achieved, a quality putting surface is key.


When you have your first meeting with the client, I recommend doing an interview. Take some time and listen to what their needs are. Find out how experienced they may be. Many putting green installations are just for fun and there may be no need to speak about “Stimpmeter Speeds” and “Undulations”. If your client is serious about his golf game, however, I recommend making sure that your installation teams are qualified in providing a putting surface that will serve their purpose. I have seen contractors take on the challenge of putting greens without adequate experience, and the outcome was never good.
I encourage you to research and learn all you can about synthetic turf putting greens.

Existing and future factors will always exist. If you plan properly, you will be proud of the finished product. Before we dive into this series, there are many factors to consider when planning a putting green. Contractors, installers, and homeowners must all learn what causes putting green surfaces to fail. This includes unevenness, dips, bumps, ridges, lines, protrusions, expansion, contraction, seam rupture, settlement, frost-heave, rough, pitted, and the uncertain.
Factors To Consider
- Inferior subsurface soil
- Leaky irrigation
- Re-occurring vegetation (weeds, tree roots)
- Inferior compaction materials
- Poor compaction rate
- Poor grading/workmanship
- Inferior putting green materials
- Poor turf installation/workmanship
- Improper seaming, no seaming tape & adhesive, or too much adhesive
- Improper infill size and placement
- Static electricity
- Improper rolling of putting green
- Top dressing
- Surface maintenance
Now that we have learned to watch out for these factors, let’s learn why we need a smooth, stable base to place our beautiful putting green upon.
Understanding Surface Speed
")
")

It is important to establish the putting surface speed according to the client’s needs. This means you will need to abide by the Stimpmeter. A Stimpmeter is a tool used to measure the speed of putting greens. It measures how easily a golf ball rolls across the surface of the green. The Stimpmeter is the way golf tournament directors and groundskeepers measure green speed. It might sound like a Stimpmeter is a fancy piece of equipment, but it’s not. Effectively, a Stimpmeter is a simple device, shaped like a small beveled yardstick, on which a golf ball can be placed and then rolled down the center. The Stimpmeter measures how far the golf ball rolls across the green, resulting in the Stimp rating of the green. Stimpmeters are 36 inches long and were originally wooden. Modern Stimpmeters are now made of aluminum. Stimp ratings in the single digits are considered slow to moderate-paced greens. Stimp ratings in the double digits are considered quick to fast greens.
When checking the Stimp speed, you will need to test on a flat portion of the green.
-
- Place a golf ball at one end of the Stimpmeter tool in a notch about six inches from that end.
- Take the Stimpmeter and slowly raise that end, by hand, until the device reaches an angle of 22 degrees. Gravity will cause the golf ball to release from the notch. There is a groove, or channel, down the center of the Stimpmeter, which keeps the ball on track as it rolls down. When the golf ball exits the ramp, it rolls out across the green.
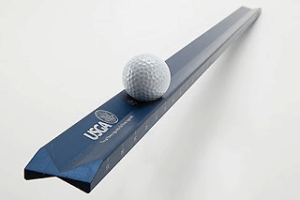
How far the ball rolls before stopping becomes the “Stimp rating,” indicating green speed. If the golf ball rolls nine feet, the Stimp rating is 9; if it rolls 11 feet, the green speed rates at 11.
The USGA just released their newly-designed Stimpmeter. It is designed to have greater flexibility for added convenience when testing the speed of your greens. For the full article from the USGA and info on how to purchase your own Stimpmeter, go to https://www.usga.org/content/dam/usga/pdf/imported/StimpmeterBookletFINAL.pdf
Weather
With everything I do in the synthetic turf industry, I always place safety and weather at the top of my priorities. Successful turf contactors stay in touch with future weather patterns.
Prior to any synthetic turf putting green installations, I recommend checking your local weatheror downloading the NOAA National Weather Doppler app to ensure that you save yourself from having a crisis on your hands. When building putting greens, excessive water can cause havoc throughout the entire build.
Prevention of Re-Growth


When installing a putting green, I recommend removing all irrigation, tree roots, plants, utilities, and everything else under the surface area. It is best to not have to worry about future re-growth, or vegetation growing up and placing pressure on the putting material. I recommend placing pre-emergent and/or weed suppressor for prevention.
Pre-emergent comes in a granular/liquid herbicide that may prevent seeds from growing underneath your putting green. Although it will not stop a rooted plant from growing, the pre-emergent will prevent all types of growth. Apply the pre-emergent before any base material. For extra protection and a surface that will allow the installers to walk, I recommend placing a good weed suppressant fabric. This will also allow for a smooth surface to roll the turf on. Always read the label on pre-emergent to understand its safety for kids and animals.
Base Compaction & Stimp Speed


Putting green surfaces that rely on the performance of the surface need complete attention. Placing base materials is just as important as placing the turf. I always tell installers to grade and compact the base materials to create a smooth, concrete-like “skate park” surface. Craftsmen that install skate park surfaces know they need to create a smooth, consistent surface. They go the extra mile using whatever machinery and skills are needed to create a surface they are proud of. Even though we are not installing skate parks, a putting green surface is similarly only as good as its base below.


Base Aggregates & Putting Greens
Grading and compaction of subgrade materials is very important for the outcome of how smoothly the ball rolls. Drainage materials should consist of clean rock and sand. I recommend using limestone chat, decomposed granite or any imported materials that have permeable qualities.
When the grading is complete, the underlying surface should be equally smooth without any compactor lines or small holes. If the subgrade materials are not smooth, the golfer will complain about irregular ball roll. It is especially important that the area around the putting green cup be consistent. Below are types of materials that I DO NOT recommend using underneath synthetic turf putting greens. These materials will not retain cohesion and/or bond and may wreak havoc on your installation.
- Beach sand
- Concrete & mortar sand
- Topsoil
- Silt
- Aggregate (rockbound)
- Loam
- Clay
- Caliche
I do recommend aggregates that are created with high-quality hard rock, sand, and gravel. Below are types of materials that I recommend for placing underneath synthetic turf. When placed in smaller lifts and compacted properly, these materials will retain density, allow permeability, and withstand excessive water penetration.
- Crushed or decomposed granite
- Limestone chat
- Type II / road base
- 3/8” minus mixture


")
Compaction Tools & Machinery
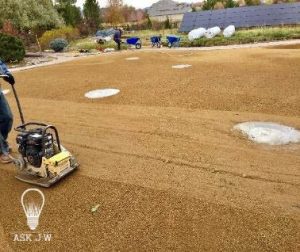
A standard walk -behind vibratory plate compactor will only compact two inches at a time to gain approximately 80% compaction. 80% is the minimum allowance that I recommend for the surface of the synthetic turf to lay on. When building putting greens, it is crucial to reach 80% or better to prevent settlement. If you import more than two inches at a time, you may sacrifice quality for production. If you are wanting to import 3-6 inches of imported aggregates at a time, then I recommend using a heavier plate compactor to achieve a dense, finished surface that reaches 80% or more in compaction rate.
A hand tamper can be used for all edges that a mechanical plate compactor cannot reach. It also is useful for compacting sidewalls of slopes and sand traps.
Fine Grading


If you are going to use type II or road base as your grading materials, I recommend placing one inch of 3/8 minus, chat, or decomposed granite on top and compact it to complete a smooth surface. Type II and road base have too much aggregate (rock) and may cause problems with proper “ball roll”.
Learning how to finely grade is a talent. The final stages of grading the surface for a putting green is crucial. I have seen installers use aluminum rod boards, 2x4s, grade rakes, and even dragging a water hose with silica sand to fill in small voids that may become a future problem. When placing base materials for putting greens, I recommend taking your time and ensuring that you don’t over-lift the materials, causing soft spots in the surface. These will eventually settle with foot traffic. It is also important to continuously check the grade around all putting green cups while you are compacting. You may need to add more material to fill any voids.
! IMPORTANT !
Clean the bottom of the plate compactor frequently to avoid “dragging”. Dragging is when the soils stick to the bottom of the plate compactor and slows the compactor down, leaving grooves in the compacted surface.
This is very important when installing putting greens.

It is very important for the 3’ radius around the putting green cup to be flat, smooth and true. When the grading and compaction of the subgrade materials are complete, take a level and check the 3’ radius around where the cup is to be placed. This will ensure the area is flat and without any imperfections. This where the golf ball will need your grading talents to simulate real play. You don’t want the golf ball stopping or curving away from the hole due to improper grading.
Putting Grades Cup Failures
The worst thing a putting green can experience is imperfection around the cup. Choosing to go the easy way and place putting green cups in dirt is no good. I DO NOT recommend this. I highly recommend placing any putting green cups in concrete. When placing putting green cups in compacted dirt, the cups tend to shift due to loosening soil caused by rainwater, foot traffic, and excessively pulling the flag in and out of the cup. When the putting green cup is not stable, it will allow the cup to move or settle, which causes the flags to tilt and/or cause the “volcano effect” (picture to the upper right). This damages the playing surface. If this happens, you will be called back to remove and replace the entire green.


Depending on the cup size, it is my recommendation that the excavation of the hole for embedding the cup should be a minimum of three inches around the exterior of the cup’s diameter. This will allow for the poured and placed concrete to wrap around the entire cup. The hole should be excavated one inch deeper than the putting green cup height. When excavating the cup hole, I recommend placing a weed barrier or a plastic bag to put the excavated soils on. This will prevent the excavated soils from disturbing the compacted subgrade surface. It is very important to keep all foot traffic to a minimum while installing the putting green cups. I have seen men kneel and leave divots in the compacted dirt, causing an irregular surface. Be light on your feet around the cups.
“I look forward to seeing you next month to dive deeper into “Perfecting Putting Green Surfaces”, where we will learn proper infill placement and the “ASK JW Cutting Method & Process”.


For more information regarding perfecting putting green surfaces, or to schedule a training please contact J.W at 888.846.3598 or email AskJW@SGWcorp.com
Suggestions for the use of ASK JW installation techniques are solely at the end users discretion; however, the user should determine suitability for the intended use by his/her own evaluation. Because the use of the materials is beyond our control, neither ASK JW nor SGW shall be liable for the outcome of any use of said materials including any injury, loss, or damage, direct or consequential, arising out of the use or inability to use these techniques and products.
*****acknowledgment USGA


