


Hello everyone! I hope your week is going well. Last month, I began a new series on perfecting putting green surfaces and how choosing the correct materials can determine the surface’s performance. I also explained how poor workmanship can make a huge difference in how the surface looks, plays, and rates on the Stimpmeter. This month, Ask JW will teach infill placement and how crucial it is for perfecting putting green surfaces and Stimpmeter speeds.
What is “Ballast” So Important For Synthetic Turf?


Like concrete, synthetic turf expands as the temperature rises and contracts as the temperature falls. Thermal expansion/contraction may vary due to the quality of materials, poor installation, immediate temperature range, and infill placement.
Even though putting green turf is flexible and can withstand the seasons, it may also move, crack, split, or rupture if little to no infill is placed and/or maintained. Infill gives longevity to the turf system. Its need for ballast prevents the system from thermal movement. Placing infill also protects the internal system from UV degradation. Knowing your infill material’s granular size, weight, and placement is very important for ballast, Stimp speeds, and appearance.


Most Effective Way To Prevent Thermal Movement From Damaging Your Putting Green Installations
- Purchase quality materials – Purchasing low quality putting green turf will set you up for failure. Not only will the turf fail; eventually your business will fail too. Don’t shortcut quality to save a few bucks. Putting green turf that is low quality may not even reach its warranty period when dealing with the harsh environmental conditions.
- Ballast – Ballas is the most effective way to control thermal contraction and expansion in putting greens. If a sizable section of turf is not provided with adequate amounts of infill to accommodate temperature movement, the synthetic turf will be allowed to move excessively which may cause wrinkling, seam rupture, and/or splitting of the synthetic turf backing. For more information regarding ballast/wrinkling go to:
https://syntheticgrasswarehouse.com/avoiding-the-putting-green-wrinkle-effect/
https://syntheticgrasswarehouse.com/ask-jw-preventing-wrinkles-turf/
- Securing of seams – When putting green synthetic turf is faced with extreme temperatures, the two connecting points between multiple sections is usually the first area to experience separating. Properly seaming two sections of synthetic turf is very critical in combating thermal expansion and/or contraction. It is crucial to use a high-quality seaming tape and adhesive when seaming two sections together. The amount of strength that thermal contraction and expansion can have over synthetic turf is astonishing. I have witnessed sections pull apart by up to 4 inches. Applying adhesives improperly, such as not using enough or compressing when installing the seam, can allow movement of the seams. If the adhesive only touches the stitch rows and doesn’t bond to the backing too, you may experience premature seam rupture due to thermal contraction and expansion. For more information on this, go to: https://syntheticgrasswarehouse.com/hiding-your-artificial-grass-seams/
- Inspection & Maintenance – Inspecting the putting green throughout the warranty period will prevent future damages, separations, and seam failures. I recommend inspecting the installation every season to ensure that the infill depths are at the manufacturer’s specifications, repairs are made, and the surface is kept clean of any debris..
Compression & Putting Green Surfaces
- compression[kəmˈpreSHən]NOUN
- the action of compressing or being compressed.
synonyms:
(physical) force · load · stress · compressing · squeezing · crushing · weight · heaviness
Believe it or not, compression is what causes imperfections in putting green surfaces. When a putting green is lacking Infill (or ballast), the surface will compress where weight is present. Therefore, it is important to understand why properly placing infill will prevent putting green surfaces from having depressions. I recommend placing infill into the putting green surface fibers, filling it up from the base and all the way to the top, then cutting it level (I will explain “cutting” in next month’s column). This will give stability to the surface, ensuring smooth play and Stimpmeter speeds.
Infill & Foot Weight


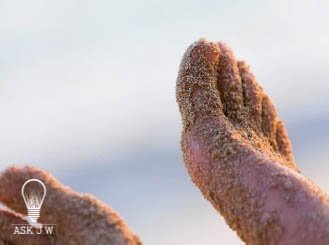
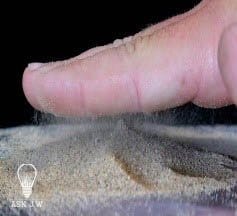
Synthetic turf putting greens are supposed to simulate natural play of the golf ball. Infill placement at proper heights not only protects the system from movement and UV degradation, but it is also the most important ingredient for perfecting putting green surfaces. Most installers are unaware of how crucial infill placement is for a golfer. If you have ever played golf on a natural putting green surface, you will find small granules of sand within the bent grass fibers and at the top surface. This gives the entire surface stability, ensures smooth play, and allows it to withstand all types of varied foot/weight distribution. The images above show how “foot traffic” alone can cause depressions on the surface.
 Depending on the weight of the player, without proper infill placement, you may succumb to dips and valleys from foot traffic, especially repetitive shots. I am not saying that the Incredible Hulk cannot use a putting green. I am saying that if the Incredible Hulk was standing or kneeling for a short period of time on a putting green surface that has little to no infill, he would cause imperfections in the playing surface.
This may be why the Hulk gets so mad at double bogeys!
Infill & Wrinkling
The stress that thermal movement can cause to putting greens can be quick and damaging. UV sunlight gives off thermal radiation generated by the hot plasma of the sun and will cause synthetic turf to wrinkle, especially putting greens. These wrinkles are created when the synthetic turf is exposed to extreme heat. The turf becomes hot and starts to move and stretch, pulling from the middle to lift and create wrinkles.

When placing turf in the summer, you will witness the turf wrinkling right before your eyes. This happens as the temperature rises. By the time the installation is complete, the heat has caused wrinkles that even three pounds of infill couldn’t even out.
This is why it is very important to do any of the following:
- Place the infill immediately behind the placement of turf.
- Place infill early in the mornings when the temperatures are low.
- Place infill in the late evening when temperatures drop (may need lights).


Seams that are poor quality tend to shrink and pull apart from section to section causing seam ruptures. When seam ruptures are exposed to UV sunlight for long periods of time, the edges of the seam dry out, shrink, and may cause delamination of the backing materials.
Synthetic turf ruptures can not only be ugly, but they get worse over time. In time, open seams and ruptures will start to deteriorate from the edge and work their way into the remaining synthetic turf.
Infill Placement & Moisture


 Precipitation (rain, snow, sleet, or hail) can wreak havoc on your synthetic turf putting green installation. Have you heard the saying “fail to plan, plan to fail”? If you are intending to place infill into putting green materials that have any moisture within them, it will have an adverse effect on the way the ball rolls and Stimpmeter speeds. Sending your teams out to install infill when there is a chance of precipitation will cost you time, money, and lots of frustration.
When moisture meets synthetic turf fibers, it sticks to the fibers and prevents infill from dropping into the base of the synthetic turf. Moisture can prevent infill from doing its job. Placing infill when synthetic turf fibers are wet is like trying to get beach sand off your feet when you leave the beach.
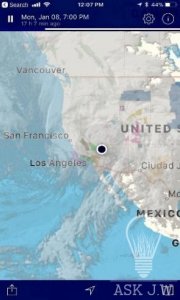 Successful synthetic turf contractors stay up-to-date on future weather patterns. I recommend checking your local weather prior to any synthetic turf installation, especially putting greens. Download the NOAA National Weather Doppler app to ensure that you save yourself and your team the hassle of placing infill into wet turf.
I have three weather apps on my phone, and they are one of my best tools in my toolbox.
Placing infill when synthetic turf fibers are wet creates issues that will cause failure within your entire installation. Below are just a few:
- Prevents Ballast – The infill will stick to the fibers, preventing them from dropping to the base of the turf and weighing down the turf system. Ballast gives stability and longevity to synthetic turf systems.
- Trapping of fibers – If the fibers are wet, the infill will bunch up and trap fibers causing large sand pockets.
- Voids – When synthetic turf is wet, infill will not drop evenly and/or to the bottom of the turf system and will create voids which may cause premature wear and/or matting.
- Wrinkling – When the correct infill amount, weight, and levels are not successfully placed, the synthetic turf may wrinkle in warmer climates.
- Matting – Matting will occur if the correct infill amount, weight, and levels are not respected.

What do I do if it has rained and the putting green surface is wet?
If you must get the job done due to time constraints and/or installation deadlines, you must dry out the turf in order for the infill to penetrate to the bottom. I recommend using a high-powered backpack leaf blower to dry out the entire surface prior to placing infill.
Yes, this can be time consuming, so learn your lesson and don’t do it again.
Once the turf is dry then proceed to infill.
Infill Placement


- What infill should I use?
- What size do I use?
- How much infill should I use?
- What equipment will I need to place the infill?
- How do I apply the infill?
- How do I now it was placed correctly?
Knowing your infill material’s granular size, weight, and how it’s placed is very important not only for ballast, but for appearance as well. I show installers a close-up view of how to properly infill synthetic turf by taking a small bucket and hand-placing the infill. This way, they can learn how much infill is to be placed, the proper depth, and how it feels on the foot in comparison to synthetic turf that has none. It is critical to understand what it takes to infill and ballast each synthetic turf product, especially putting greens. Avoid using materials like beach sand, coal slag, dirty silica, or fine cement sand.
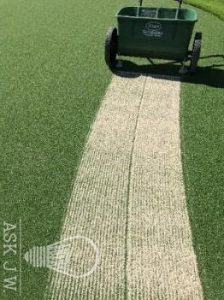
It is important to follow your manufacturer’s recommended infill amounts and specifications. Invest in a good drop spreader. Most supply houses carry Scotts drop spreaders, which cost approximately $80. A good drop spreader will allow the infill to be evenly distributed. This is crucial for perfecting putting green surfaces. You can also order the new Superseam turf brush (pictured above), which attaches to the drop spreader and places and brushes the infill in at the same time!
Properly placing infill into putting greens is very important for ensuring the golf ball rolls smoothly. I highly recommend owning a power broom if you choose to install putting greens. Nylon and textured PE putting greens need infill to be placed internally from the bottom to the top of the finished surface, and having a mechanical brush will make the job easier and more efficient.
Properly placing infill into putting greens is very important for ensuring the golf ball rolls smoothly. I highly recommend owning a power broom if you choose to install putting greens. Nylon and textured PE putting greens need infill to be placed internally from the bottom to the top of the finished surface, and having a mechanical brush will make the job easier and more efficient.
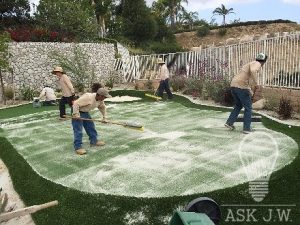
When dropping infill sand into your putting green, it is very important NOT to place too much at one time. The objective is to fill up the voids between the fibers from the bottom to the top. If too much is placed, not only will it trap the fibers, but it will cause an uneven surface for the ball to roll on. I recommend making passes with the drop spreader starting from east to west and then north to south. Then repeat this process again. Crisscrossing the placement will ensure that the infill is placed evenly. Do not overlap the placement with the drop spreader by more than two inches. If you do not maintain this overlapping, you may cause bumps prior to the cutting process.
Repeat this until all calculated infill is placed and has reached the top of the surface where it is visible to the naked eye.
After every completed pass, I recommend using a stiff asphalt push broom to work the infill sand to the base of the putting green surface.

Once the sand infill has reached the top of the surface, take a stiff push broom and aggressively push and level the top layer of infill sand. Brush off the excess and haul away. I recommend placing SGW’s Green Durafill (small) as a “top dressing”. This will produce a beautiful green appearance when completed.
Be mindful of static electricity while incorporating your infill. When using a substandard infill and infill size, the installer must aggressively scrub the infill with either a push broom or powerbroom to work the infill into the surface. This excessive scrubbing creates static electricity and causes most infill to stick to the fibers, therefore never allowing them to reach the base of synthetic turf.
By utilizing the correct infill and placement, you will make the golfer happy and the synthetic turf industry proud.
Compression Rolling


I recommend pressure rolling after the infill is complete. This will allow the fibers to be pressed down to the infill height and create a smooth surface for the ball to roll on. This compression will create equal Stimpmeter speeds. You may rent or purchase a water roller which will work for smaller putting green projects.
After the infill placement is complete, the surface is rolled, and the cups are cleaned out, take a water hose and evenly spray down the entire putting green surface. This will assist with the removal of any residue and bring out the putting green’s surface vibrant color.

I look forward to seeing you next month for part 3: “Perfecting Putting Green Surfaces”, where we will learn the Ask JW Cutting Method & Process.


For more information regarding perfecting putting green surfaces, or to schedule a training please contact J.W at 888.846.3598 or email AskJW@SGWcorp.com
Suggestions for the use of ASK JW installation techniques are solely at the end users’ discretion; however, the user should determine suitability for the intended use by his/her own evaluation. Because the use of the materials is beyond our control, neither ASK JW nor SGW shall be liable for the outcome of any use of said materials including any injury, loss, or damage, direct or consequential, arising out of the use or inability to use these techniques and products.


