


In my three decades in the industry, I have witnessed installers place putting green fringe in pieces, angles, and directions that create more work for them. Installers spend countless hours seaming remnants, scraps, and leftovers from other projects just to save a dollar, but in all actuality, they’re not saving anything.
This month, Ask JW will express the importance of fringe design, layout, and why multiple seams may cost you in the long run.
“When you choose cost over quality, it will eventually show.”
—JW


What is Fringe, and Why Do I Need It?
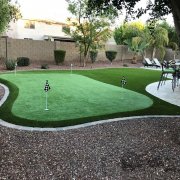
Fringe is a section of the fairway sometimes called the “apron”. This apron connects the green and the fairway together. Depending on the design, synthetic turf fringe can be several feet in width and as narrow as six inches. Do you need it? Unless you want the ball to roll off of the green, I would say yes. If you want to further your career as a turf installer, it is important to learn all you can about putting green fringe, its uses, and how craftsmanship with patience can produce some gnarly putting greens.
Plan, Design, & Budget


“Were the savings really worth it?” That is the question I ask installers when they call me up after installation regarding visible seams that the homeowner has pointed out. Many turf installers do not plan, design, or even budget large sections for their fringe installations. They feel the focus should be on the putting green, and the fringe is just something that prevents the golf ball from rolling off. Well, it does that too! However, it also does much more.

Putting green fringe has many uses other than helping keep the ball on the green. For one thing, fringe gives stability and protection to the putting green. Did you know that a putting green with a good amount of infilled fringe will keep its shape longer? Fringe that “collars” a putting green assists in the prevention of movement of the green itself. Have you ever seen putting green fringe 15-20 years later? I have. They move a lot. Do yourself a favor and value your fringe installation just like you do the putting surface.

Fringe Waste.. Someone Has to Pay For It


Figuring out fringe measurements can be difficult. I always recommend calculating larger sections and less seams when estimating putting green fringe. Most often, contractors measure from “outside to outside” and price the putting green per square feet. This may work for some, but I recommend designing a schematic and creating a job cost when including fringe. I always hear horror stories from contractors losing money on putting greens. This is usually either due to them having to rip it all out, re-purchase turf, and reinstall the fringe correctly, or they get down to installing the green and figure out they have used all of their profits on fringe due to their poor estimations. I recommend focusing on fringe placement just as you do with the putting green surface; it is just as important. Worrying about overbidding the install, losing the job, and placing scraps will not excel you in the synthetic turf industry. Go over the installation process with the client. Explain to the client what needs to be done for the fringe to be installed properly. Explain to the client that having a large amount of seams in putting green fringe is not standard to the industry and the seams may become victim to seam separation. Standing, twisting, and continually chipping on top of fringe seams will cause the seam to separate and possibly remain that way over time. I always recommend designing the green so you can maximize long fringe runs. Cut down the center of a full roll of fringe and use the two sections for the left and right sides of the putting green. Most rolls are 15 feet wide, and cutting down the middle will give you approximately 7’6”. Depending on the radius and amount of contouring you are wanting, 7’6” and under can be used to give you a nice size fringe that will look great, allow stability, and can be chipped from.
If you have been in the synthetic turf industry for a long time, you’ll understand that having more seams is not the popular thing to achieve. It is time consuming, costly, and does NOT do your installation justice. Having excessive seams reduces fringe longevity. I have spoken throughout the years about how thermal expansion and contraction pull at synthetic turf, especially when it is combined with heat and the earth’s movement. Introducing excessive seams in putting green fringe will eventually cause them to become visible and unsightly.
Fringe Vs. Wedge

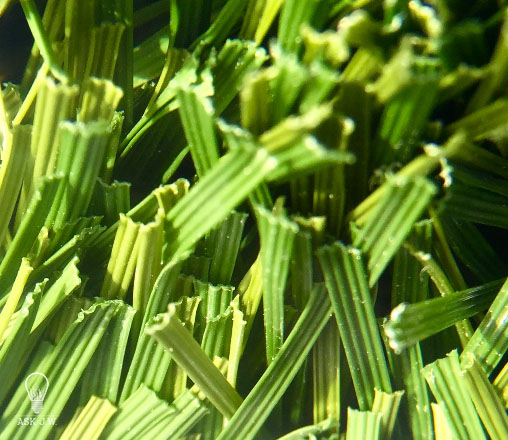
Fringe takes abuse from club heads. Imagine a club head and its driving force slicing through natural grass fibers, creating friction and drag along with it. The image to the upper left shows natural grass being ripped apart by this force. When putting green fringe is not installed with quality in mind, it will eventually fail the golfer.
What Type of Turf & Pile Height is Best for Fringe?


Fringe can be used to create different levels of “chipping”. Different pile heights and colors not only create beauty, but they also simulate play from fairway to fringe to green. I recommend using a high-quality turf for fringe. The turf you choose will determine longevity and play for the client. A cheaply constructed turf will eventually fail. I do not recommend using a tall pile height. Taller pile height will NOT simulate natural play of the ball. The taller the pile height, the additional drag the club will experience when slicing through and under the ball. This will train you differently than you will need when playing on a real course. The name of the game for fringe is to simulate chipping the ball either in the hole or close to it. The ball must lie high enough to allow the club head to swing though it without dragging excessive turf fibers along with it. If you use a landscape turf, you will constantly need to maintain it to keep the golf ball from settling deep into the landscape turf fibers. Therefore, it is crucial to choose the correct turf for fringe. I know many installers today that still use scraps from other jobs with tall pile height landscape turf for their fringe. This may look good, but it doesn’t simulate the feel of a real golf course for your golfer. I will touch more on landscape turf as fringe later in this column.
UV Light Will Call You Out!


UV sunlight, or any light that reflects off synthetic turf fibers, will call you out. That is what I tell installers when they want to rush a seam or place sections of turf on angles that are not in line with adjoining sections. You will be able to see a color difference in your fringe the minute you place it down. If you think adding infill and brushing it up will make it disappear, you’ll often be wrong (and realize it too late).
Layout

Layout is crucial to aligning sections of fringe. Even though turf fibers are hard to mark, I recommend using a chalk line for layout. My favorite is the large chalk box with a cord instead of a string. It will allow you to mark lines more efficiently. It is advantageous that you snap chalk lines when cutting sections for your layout. It is a good habit to have and will lower your waste percentages. I prefer a large chalk box instead of a small one. The large chalk box will give you more visible lines to cut on and you rarely fill up when needed. I recommend using a lime green chalk available for purchase at Home Depot or Lowe’s. The lime green is easily visible and easier to clean up than other colors. Corners will take up a lot of waste. When you get to corners, you will need to use large sections that will cover the entire corner, and then add some into the face and sides of the fringe.

Fiber Direction


Fiber direction is crucial when doing layout of fringe. As mentioned above, UV sunlight will point out any sections that are placed incorrectly or to an angle where the sunlight will create a visible separation line. I have witnessed many installations where contractors complain that they received two different dye lots for their project when in fact they had installed the turf on different angles.
Understanding the alignment of the fibers and its location to connecting sections is crucial. If the fibers and underlying gauges/stitch rows are not placed in the same direction, it may cause the entire project to show variations in color to the naked eye. You can only angle synthetic turf so much before it will call you out.
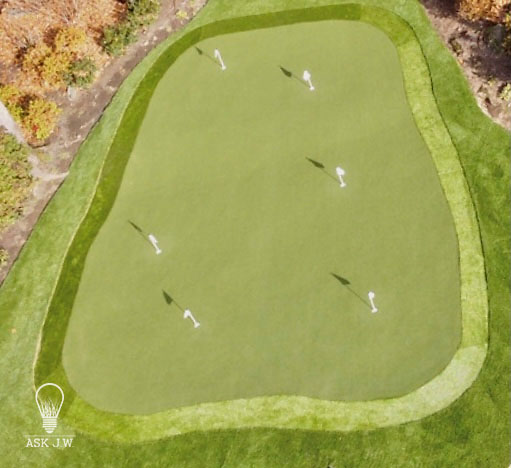
If I Use Long Sections, How Much Can I Rotate Before It Is Visible?


The images above are from a contractor that was using left-over landscape sections for fringe on this installation. Fortunately, the turf was a high-quality, low pile height landscape turf that would be ideal for chipping. As you can see, the color changes have already called him out. There will be no amount of brushing and infilling that will make this go away. When you change the direction of the fibers, the UV sunlight will show you that it will not work. Before you place a nail, I would lay the turf out and see if you will have color issues due to the rotation of the turf. Normally you can rotate turf up to 35 degrees before it starts to show. I recommend purchasing large enough sections that can be placed in the same direction. Why roll the dice?
Seam Vs. Labor Vs. Longevity


If you have been in the synthetic turf industry long enough, you’ll know that having seams is inevitable. Having excessive seams is not. You truly must sit down one day and do the math. Having to place seaming tape and adhesive is already a task, now add an excessive amount of seams and you just added excessive labor as well. Properly nailing seaming tape and placing adhesive with your team requires close attention to detail. Every inch of seam costs time and labor, not to mention tape and adhesive. When you choose to use small sections with many seams, it reduces the surface’s ability to play properly. Extensive foot traffic and chipping over seams will reduce longevity and may create possible seam rupture.
Ask JW Fringe Adhesive Tip


Controlling how much adhesive you want to apply is critical. Using a mortar bag or cutting the corner off a contractor trash bag works great, like applying pastry on a cake. Just carefully pour the adhesive into the bag, then cut off the end, fold to close and unfold to open. Then start squeezing it out! This works great for seaming putting green fringe to the putting green surface.
Nails Vs. Seaming Tape & Adhesive


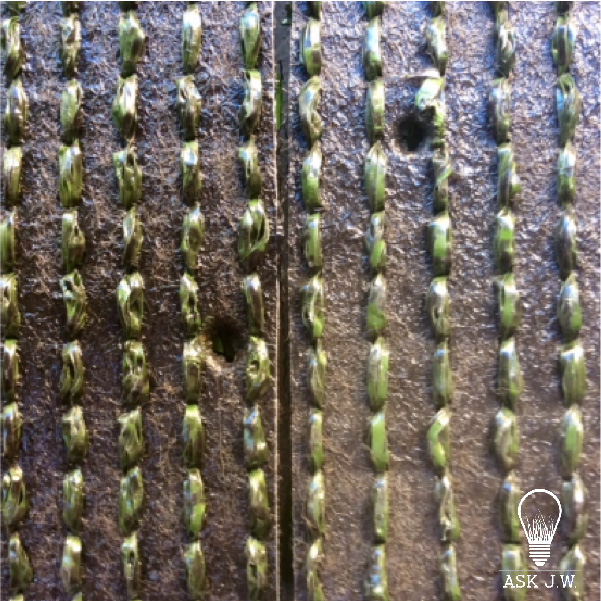
If you choose to use nails instead of adhesive, you may get future seam rupture. I have witnessed seams pull apart within weeks in extremely hot weather due to improper stitching of the seam with small nails. If you are going to use the stitching method, I recommend your compaction in the seam line be 80% or better. Small nails will not grab when the soil is not compacted properly. If you choose the stitching method (which I do not recommend) you must use galvanized finish nails for the putting green side. I have witnessed one-inch red dots on the putting green surface from rust that had gravitated up, which was not a pretty sight. The rust is from moisture and the nail being of raw steel. I recommend finish nails due to the small head that can be hidden in texturized putting green material and can be set with another nail or nail punch. For the fringe side of the seam, I recommend 3½” galvanized framing nails. They have a small head which can easily fit between 3/8” gauges and will not leave red dots behind. The image above right shows 3 ½ inch framing nails which will probably not be visible in the fringe when rusting, but I would use galvanized to be on the safe side.
Wrapping Fringe at Sand & Grass Traps


Get your wallets out if you are going to wrap sand or grass traps. There is no way of getting around placing small sections when it comes to wrapping sand/grass traps. The top fringe still must be placed in large sections to avoid seams. Seaming tape and adhesive is a must when securing fringe at all traps. I recommend wrapping/tucking the turf into the trap for beauty and longevity.


Infill & Fringe


Infill must be maintained throughout the fringe. The club face cannot slide through the fibers if the fibers are flat or the infill is not at proper height. Foot traffic and continuous chipping will cause wear and tear on the fringe surface. Keeping infill levels at approximately ½” below top fibers is optimum. When the infill starts to deplete, additional infill must be added. If the infill becomes too low, the club face will start to dig into the base of the turf and will eventually cause fiber damage. I recommend purchasing an infill gauge for your team to ensure infill elevations.


The stress that thermal movement can cause to putting greens can be quick and damaging. UV sunlight gives off thermal radiation generated by the hot plasma of the sun and will cause synthetic turf to wrinkle, especially putting greens. These wrinkles are created when the synthetic turf is exposed to extreme heat. The turf becomes hot and starts to move and stretch, pulling from the middle, uplifting, and creating wrinkles.
This movement causes the seam to separate between the fringe and the putting green surface. If the fringe is not secured, it may pull away and leave a gap.
When placing turf in the summer, you will witness the turf wrinkling right before your eyes. This happens as the temperature rises. By the time the installation is complete, the heat has caused wrinkles that even 3 pounds of infill can’t even out.
Infill & Wrinkling
The stress that thermal movement can cause to putting greens can be quick and damaging. UV sunlight gives off thermal radiation generated by the hot plasma of the sun and will cause synthetic turf to wrinkle, especially putting greens. These wrinkles are created when the synthetic turf is exposed to extreme heat. The turf becomes hot and starts to move and stretch, pulling from the middle, uplifting, and creating wrinkles.
This movement causes the seam to separate between the fringe and the putting green surface. If the fringe is not secured, it may pull away and leave a gap.
When placing turf in the summer, you will witness the turf wrinkling right before your eyes. This happens as the temperature rises. By the time the installation is complete, the heat has caused wrinkles that even 3 pounds of infill can’t even out.
This why it is very important to either:
- Place the infill immediately behind the placement of turf.
- Place the infill early in the mornings when the temperatures are low.
- Place the infill during late evening when temperatures drop (you may need lights).
Infill Placement & Moisture


Precipitation (rain, snow, sleet, or hail) can wreak havoc on your synthetic turf putting green installation. You have heard the saying “fail to plan, plan to fail”. If you are intending to place infill into putting green materials that have any moisture within them, it will have a traverse effect on the way the ball rolls. Sending your teams out to install infill when there is a chance of precipitation will cost you time, money, and lots of frustration.
When moisture meets synthetic turf fibers, it sticks to the fibers and prevents infill from dropping into the base of the synthetic turf. Moisture can prevent infill materials from doing their job. Placing infill when synthetic turf fibers are wet is like trying to get beach sand off your wet feet when you leave the beach.
Successful synthetic turf contractors pay close attention to future weather patterns. I recommend checking your local weather prior to any synthetic turf installation, especially putting greens. Download the NOAA National Weather Doppler app to ensure that you save yourself and your team the hassle of placing infill into wet turf.
I have three weather apps on my phone, and they are one of my best tools in my toolbox
Placing infill when synthetic turf fibers are wet creates issues that will cause failure within your entire installation. Below are just a few examples.
- Prevents Ballast – The infill will stick to the fibers, preventing them from dropping to the base of the turf and ballast (weighing down) the turf system. Ballast gives stability and longevity to synthetic turf systems.
- Trapping of fibers – If the fibers are wet, the infill will bunch up and trap fibers, causing large sand pockets.
- Voids – When synthetic turf is wet, infill will not drop evenly and/or to the bottom of the turf system. This will create voids in the system which may cause premature wear and/or matting.
- Wrinkling – When the correct infill amount, weight, and levels are not successfully placed, the synthetic turf may wrinkle in warmer climates.
- Matting – Matting will occur if the infill amount, weight, and levels are not respected.

What do I do if it has rained and the putting green surface is wet?
If you must get the job done due to time constraints and/or installation deadlines, you must dry out the turf in order for the infill to penetrate to the bottom. I recommend using a high powered (backpack) leaf blower and dry out the entire surface prior to placing infill. Once the turf is dry, then proceed to placing infill. Yes, this can be time consuming, but that reinforces the importance of checking the weather before starting a job.
Instill Teamwork & Educate


Now that we understand that fringe is a crucial part of putting greens, we need to provide the front line with the correct materials, time, and patience when connecting fringe to putting green material. Depending on the size of the green, it can be too difficult for one or two people to accomplish. You must have enough labor when installing fringe, especially if the fringe has sharp radii. The sharper the radius, the harder it is to open for seaming tape and the application of adhesive. Remember, the connection is very important and will need to be adhered properly to prevent separation of the putting green from the fringe. There will be many times where new members join your turf team. It is very important that you teach them proper fringe installation and procedures so that your installations become error-free.
Maintenance

Putting green fringe will need to be kept clean and well maintained. Leaves and other vegetation particles may work themselves down into the fringe. This will change the performance of chipping if it is not maintained. I have reiterated above how crucial infill is to putting green fringe. Grass traps will need to be brushed up to allow for a smooth chip shot. If the infill in grass traps gets too low, you will need to replenish it so that the head of the golf club does not drag through your swing. Sometimes the soils may shift in a larger trap, which may cause wrinkles. You may need to add infill or nails to flatten them out. Make sure you do not trap the fibers with the nails’ heads. The infill may need to be vacuumed out to achieve a good embedment.


Family of golfers. Two of my four sons, Alec and Dakota Wadkins.

For more information regarding placing synthetic turf for putting green, or to schedule a training, please contact J.W. at (888) 846-3598 or email AskJW@SGWcorp.com
Suggestions for the use of ASK JW installation techniques are solely at the end users’ discretion; however, the user should determine suitability for the intended use by his/her own evaluation. Because the use of the materials is beyond our control, neither ASK JW nor SGW shall be liable for the outcome of any use of said materials including any injury, loss, or damage, direct or consequential, arising out of the use or inability to use these techniques and products.


