


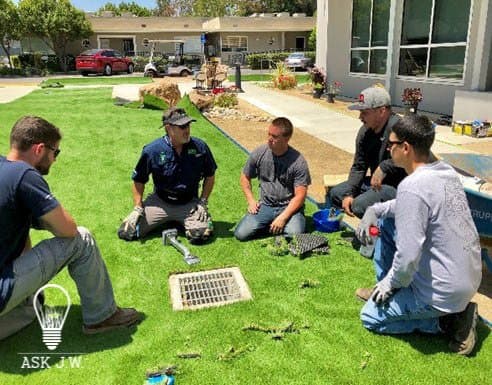
The synthetic turf industry has evolved over the past couple of decades, and with advanced technology, research, and development, synthetic turf manufacturers are producing thicker, more realistic turf. However, these changes have created more difficult installation processes. This month, ASK JW will go in detail on the dreaded “Mohawk” and how seam integration can prevent it.
“An undetectable seam doesn’t become undetectable by itself”
Ask JW
How Many Times Have We Learned From This Lesson?
When it comes to integrating seams, as a synthetic turf installer you have the option to either pass on the work to another qualified installer or learn not to manipulate its fibers. It can be easy installing sections of turf without seams, but to conquer seam perfection takes concern, care, and craftsmanship.


Having little or no time to install seams will always place pressure on the installer. There may be times where a project has a tight deadline, but rushing synthetic turf seams will only make it worse. Having and taking the time to learn, practice, and hone your craft will only make you better. Every project is different than the next and so are the seams that you are placing. Make sure you allow yourself plenty of time to craft an invisible seam.

If you are not a patient person, then you may want to stop reading and seek a new career. Perfecting seams requires incredible patience. If you are allowed the time, then you can be patient. You are dealing with two sections of turf, seam tape, glue, and a surgically sharp knife, so yes, you will need patience!
“Don’t beat yourself up…creating undetectable seams will not happen overnight”


There are many factors when creating invisible seams. Getting to know your turf is one of them. If you want to be successful in the synthetic turf industry, then get to know your turf. I receive calls every week from installers asking me questions regarding their turf problems. During these conversations, I get baffled by the questions that are asked mainly because they have little to no knowledge about their products that they are using.
You can be one of those “live and learn” contractors, or you can get educated about what you do, how you do it, and why. Don’t be one of those installers that never has enough time to do the job right but always enough time to do it over. I have witnessed installers spending valuable time and money repairing poor workmanship, all because they were chasing the dollar and not getting to know their turf. Get all your products that you install, sit down with them, and get to know them like you do your friends.
You may contact me regarding additional information and training, or go online and read the many columns and articles that I have written.
Critical Terms to Remember
- Undetectable: not easily seen, barely able to be perceived
- Mohawk: In the synthetic turf industry, a mohawk is a visible line of fibers that cross at the center of a seam
- Integration: the action or process of integrating, unifying, being united or made into a whole
- Scrim: the backing of a synthetic turf roll that extends beyond the fibers of each side of the roll
- Gauge: an outline of rows of tufted fibers stitched into the backing of synthetic turf rolls
- Dense Yarn/Fiber Pressure: increase in density of yarn/fiber creating pressure
- Subgrade Soil Stability: the underlying soils being of quality, firm and steadfast
- Synthetic Turf Seam Integration: combine one thing with another so that they become a whole – the action of forming two sections of synthetic turf together to unify as one
- Seam Reflection: the dynamics of light (sunlight) creating the connected seam to be visible
- Matting: In the synthetic turf world, matting is described as turf fibers lying flat.
- Manipulation of fibers: when friction is placed upon the turf fibers to change its angle and/or direction.
- Adhesive Seam Compression: pressure that is applied to seaming area of two sections of synthetic turf onto adhesive glue and seaming tape
- Synthetic Turf Seam Rupture: break or cause to break forcibly into halves or along the grain/gauges of synthetic turf backing.
Below are some important factors and questions to consider. To be the best in this industry, I say learn everything you can and get good at it.
SYNTHETIC TURF 101
- How is your synthetic turf made?
- What is the fiber makeup or design? Are the fibers monofilament, slit film, mono, or textured?
- Why is fiber structure important to longevity?
- What is pile/yarn?
- What is yarn denier?
- What is tufting?
- What is tufted pile height?
- What is pile weight?
- Is it woven or tufted?
- What is primary backing?
- What is secondary backing?
- How is it put together?
- What are its dimensions?
- What is the backing coated with?
- What are drainage holes and their measurement in distance to one another? Why is this important?
- What is its gauge size and why is it important when seaming?
- How much does it weigh?
- What is its warranty?
- What is a prorated warranty?
Every turf product is different than the next. When you know all about the products you provide, sell, and install, you will you be honing your craft. Getting to know your turf and how it’s made will make you better at installing seams.


Why are Synthetic Turf Seams Visible?
- They are two different turf styles or pile heights.
- The turf you are installing may be very dense and the dreaded *Mohawk is occurring.
- The two sections of turf to be seamed are not in line or on an angle to each other, creating a visible seam line due to fiber angles and direction of light. We will learn more on this later in the column.
- Their constructed seam is too far apart from each section.
- Their constructed seam is too close from each section.
- The fibers have been cut, allowing excessive infill to part the seam line.
- Seaming with embeds (nail, staples). Seaming with embeds causes manipulation to the turf fibers. Do you want to get better? Then stop seaming turf seams with embeds.
- Seaming tape is too thick. Seaming tape that has a thickness more than 1/16” will cause visibility on hard surfaces. Tennis court surfaces and putting greens are sensitive to thickness when it comes to having the surfaces expected finish elevation.
- Too much adhesive applied to seaming tape. This may cause the adhesive to seep up through the drainage holes.
- Infilling the seam line too fast and too heavily. I recommend hand filling the seam until the infill has reached half the turf fibers’ elevation. This will prevent parting of the seam.
- Over-manipulation! This is the #1 reason why visible seams are visible. We will learn more on this later in the column.
“Integrating synthetic turf seams is crucial to the beauty and longevity of your installation”
-JW

INTEGRATE
[ˈin(t)əˌɡrāt]
VERB
- combine (one thing) with another so that they become a whole.
Why Do I Need To Integrate?

When you integrate synthetic turf, you alleviate the chance for the dreaded “Mohawk”. Most installers don’t know or even care if the mohawk is happening until they try to pick up the check. Still today I receive calls, text messages, and even FaceTime calls from stressed out landscapers pleading for my help to make “It” go away. The problem is, “It” (the Mohawk) will never go away. If anything, by manipulating it you are just making it worse.


The Mohawk is a result of pressure. Most of the synthetic turf manufactured today has thatch fibers integrated between the turf fibers. These thatch fibers are tufted within the primary fibers which allow them to stand upright. This helps avoid premature matting.
When the scrim (flange at the edge of the roll) is removed, the pressure of the fibers immediately pushes outwards. When the two section edges are joined together for the seaming process, they cross into each other like the top of a tipi, causing the dreaded mohawk.


There are many installers that have luck with straight seaming, but when asked why they chance it they shrug their shoulders and say they will learn it when they need to. Here are a few installs that they took that chance on. Not only did it hold up their payment, but it put a dent in their egos.

By contrast, this contractor used the Superseam Tool to integrate a seam that ran directly through the focal point, and there was no other way to run the sections due to waste. The craftsmanship integrating the two sections of synthetic turf together unifying them as one is as good as it gets.
Here is a way that I teach to find out if the turf you are seaming will create the dreaded mohawk.
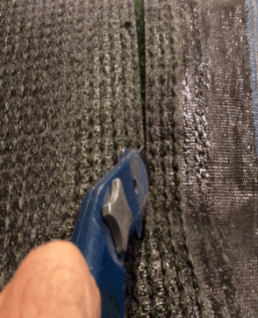
- Take one section of turf approximately 5 feet x 8 feet and flip it over with the backing facing up.
- Take a sharp turf/carpet knife and cut a straight line between the gauges from end to end on the left side.
- Take a sharp turf/carpet knife and cut an integrated superseam from end to end on the right side.
- Flip the three cut pieces over and put them together.
As you can see, the straight seam has created a mohawk within its own piece. The integrated seam is undetectable.

To be successful and stand above the rest, you will need to perfect synthetic turf seam integration.
This next month I will dig deeper into integrating pros and cons, mishaps, and tips and tricks on being an integration specialist. ????
For more information regarding the “Dreaded Mohawk”, contact JW at askjw@sgwcorp.com or call 888.846.3598


