


Throughout this series, we’ve spoken about integration, the Mohawk, and how unifying two sections of synthetic turf can be difficult. We learned that every installation is different from the next. It is your obligation as a craftsman to create invisible seams for your clients.
This month, ASK JW will share tips, tricks, and special techniques that will assist you in preventing mistakes and creating invisible seams.

“There is never enough time to do the job right…but always enough time to do it over … don’t be one of those guys.”
Above is a saying that I continually convey to installers when they make excuses as to why their seams turned out like crap. Their excuses never validate the poor workmanship they leave behind. Being good at something requires having no excuses to get there. Excuses only satisfy those who make them, so I recommend you be proactive and learn how to become the best at unifying synthetic turf seams; you will see your profits elevate.
JW
Safety

Having a first aid kit on the job site is a must. When installing synthetic turf, there are many injuries that may occur, and being cut by sharp blades is one of them. Make sure you have the proper medical supplies in each kit to render aid to anyone in need. If the injury is too bad for a simple first aid kit, call 911 or visit the nearest hospital.
Weather


Successful synthetic turf installers stay in touch with future weather patterns, especially installing seams. I recommend checking your local weather prior to any synthetic turf installation or download the NOAA NATIONAL WEATHER DOPPLER APP to ensure that you are placing your seams in good weather. I have three weather apps on my phone; they are one of the best tools in my toolbox.
Layout & Seams


Before you go and get all crazy with your design, you may want to consider having seams or designing the area to fit within the roll size. If not, you may need to consider where seams will land within the design. Having seams that land in walkways, play areas, and focal points may not be a good idea. Areas with continuous foot traffic may cause “parting” of the fibers and will cause the seam to become visible.


When placing seams that are within entrances, exits, playgrounds, and under swing sets, it may be in your best interest to absorb the cost of having material waste and re-design your layout so the seams will not land in these areas.

If you must have seams in areas where heavy foot traffic will be present, I recommend using Superseam Pro 444 Adhesive applied on SGW high-quality seaming tape to unify the sections together. Heavy foot traffic will cause the seam to separate when using inferior methods. Superseam Pro 444 is the real deal.
Subbase & Seams

The worst move you can make as an installer is to place seams over subbase materials that are inferior, rocky, or unlevel. This will cause the seam to either protrude, depress, or cause the seam to move when securing. Make sure all subbase materials are compacted smoothly where seams are to be installed.
Seams & Sunlight

Believe it or not, most seams are visible due to sunlight reflection. When the fibers are faced a certain way, it changes the dynamics of its visibility. Sunlight will reflect off of the fibers, which the human eye sees as a sheen or shine. Therefore, it is important to position the fibers facing towards any visual focal points. In many installations, the contractor has no choice but to place the synthetic turf a certain way to prevent waste. This is important in residential and commercial installations.
Integrate Vs. Straight


I recommend integrating all cuts around trees, shrubs, columns, rocks etc. Cutting straight relief cuts may cause the dreaded “mohawk” to appear. A properly integrated seam will not visible to the naked eye. It will also show less foot traffic than a straight seam. 
JW Recommended Tools & Materials
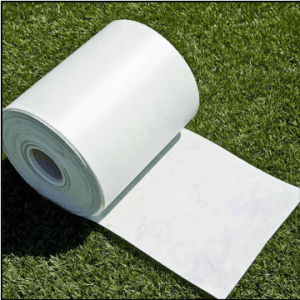
SGW SYNTHETIC TURF SEAMING TAPE
This seaming tape is manufactured with a special film on one side to prevent moisture effecting the adhesive for proper curing. This side is to be placed “face down” on the compacted soil.
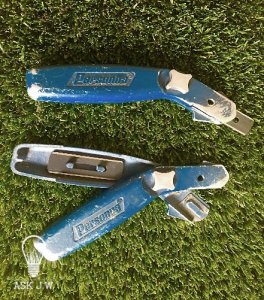
SHARP KNIFE & BLADES– Choosing a knife is a personal preference. I recommend changing out blades every 10-15 feet. For seam surgery? Every 3-5 feet. This will mean that you will need plenty of blades to be skillful.
Blade Container


It is very important for each installation crew to have a blade container to store used blades prior to discarding them into the trash. I have witnessed installers placing used blades on chairs, tables, block walls, and planter beds. They always say that they will pick them up at the end of the job, but there are always one or two blades that get left behind. Blades may cause injury to you and to others. I recommend using a blade container to store all used blades during the installation process so you don’t chance leaving any behind.
If you do not have a blade container, then I suggest using an empty plastic Gatorade bottle. Its works great for used blades and you can throw it away with every install.


CARPET KICKER – This isn’t a tip or trick. It is a must-have tool when installing seams. Other than a good knife and sharp blades, a carpet kicker is a must for every seam installation. It allows the installer to position the gauge width at the seam line. Invest in the professional version like the one in the image below. It has a dial for spike height adjustment.
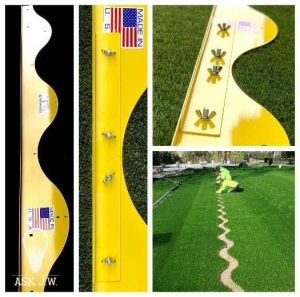
SUPERSEAM TOOL – The superseam tool eliminates the dreaded “Mohawk” and hides seams in all landscape turf and putting greens. The superseam tool and its methods not only create a seam that is undetectable but also a seam with superior stability and integrity for longevity of wear and tear. For the larger projects that have long runs, the superseam tool has a connector bracket that connects as many superseam tools as needed for the seam’s length. It is up to you and your installers to understand, follow, and perfect these methods to ensure a successful seaming installation.
“DON’T PRACTICE WITH THE SUPERSEAM TOOL TO GET IT RIGHT…….
…………… PRACTICE UNTIL YOU CAN’T GET IT WRONG”.


SUPERSEAM ADHESIVES – Superseam 283C and Superseam Pro 444: the strongest turf adhesives on the market today. Superseam Pro 444, when applied correctly, will outlast the life of the seam.


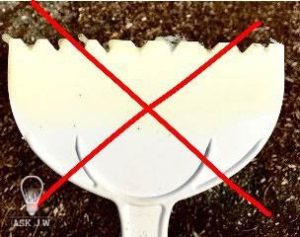
ADHESIVE TROWEL – In my decades of being in this industry, I have witnessed some crazy tools being used to apply turf adhesives. I have seen drywall spatulas, cardboard, turf scraps, folded seaming tape, and yes, a paper cup. Using the improper tool to apply the adhesive will cause the seam to fail.
All adhesives on the market today have their “width of material” written in their specifications of how much to be applied to the surface.
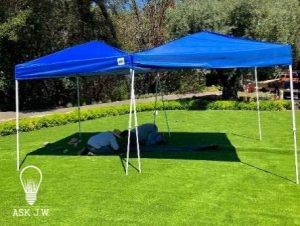
POP-UP TENT – Working in the hot sun is no fun unless you’re a lifeguard. I recommend purchasing a few pop-up shade covers for your crew. This is an inexpensive way to have immediate shade. It also cools the turf’s surface temperature quickly and assists in the installation quality of your seams.
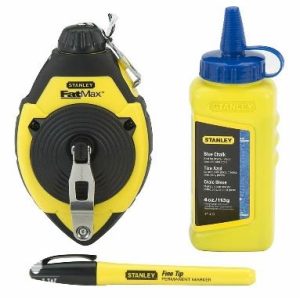
CHALK LINE – For snapping chalk/guidelines on synthetic turf backing when the gauges are not straight.


SCISSORS – I recommend carrying at least two pairs of scissors in your tool bag. They are great for trimming seam edges and very useful in trimming elevated fibers and blending in seams.
Inspecting The Gauges


It is very important to know all about the backing and gauges of each product that you install. Inspecting the synthetic turf that you purchase is the first step in having a successful seam installation. This does not mean that the turf is defective. This is a common practice in being successful.
Inspecting the edge of the roll will allow you to decide how many gauges that you will need to cut in and away from the scrim edge (factory flange). Most synthetic turf backing becomes thicker within a few gauges (away from the scrim). There may be times when the backing has excessive coating during its manufacturing process. This does not mean the turf is defective, unless the fibers are shifted and elevated. You may have a roll where the gauges are slightly off from being perfectly straight. In every installation, you will need skill, determination, and patience when creating invisible seams.


A colored chalk line works great for establishing straight seaming lines when you have stitch rows that are slightly misaligned. When cutting a chalk-lined surface, I recommend changing the blade out every 3 feet. Remember, blades are cheaper than labor.
I recommend using high-quality scissors for trimming excess that was left from the initial cut.
Choosing a cheap pair will cause the edge to fray and may be visible when the seam is completed.
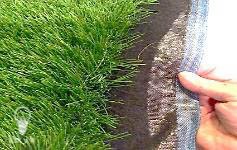
Cutting Permeable Turf Backing


When cutting seams into permeable backing, you may experience fraying. Fraying will occur if your blade is dull or when you’re cutting the edge too fast. For accuracy, I recommend using the “scribe & cut” method. This allows a cut to be clean and tight and will allow for an invisible seam.
Start by taking the point of the knife and slowly run it down the desired location, creating a “scribe”. Repeat until the blade breaks through the backing (cut). Scribe and cut, scribe and cut, repeat….


It is very important that you do not leave excess backing when cutting the seam line. I recommend cutting close to the stitch row, but far enough away for stability. When you have excess backing left on both runs, you may have overlapping, which will cause the seam to be visible. If you want to be a surgeon, then I recommend taping the fibers away so that you can make precision cuts. I also recommend laying a turf nail flat and doing surgery to cut out excess backing, then adhere with strong adhesive. Using gloves will give confidence to the inexperienced beginner.
JW Triangle Nail Method
JW Triangle Nail Method

There is nothing more aggravating than maintaining the gauge width throughout the seaming process. I have witnessed seams move half an inch within a few hours due to temperature change. When the turf and the nails are hot, placing one temporary nail is not enough to prevent the turf from moving. I recommend seaming early in the morning when the temperatures are low and use the JW Triangle Turf Nail Method.
When temperatures rise while installing seams, there may be a chance that you will need to constantly adjust the seam line to the correct gauge width due to thermal movement. Your seam is not finished moving until the adhesive is cured, so yes, that means you have to check it continually until it is.
METHOD: When the seam line is at the correct gauge width, place 3 turf nails in a triangle pattern approximately 3 inches apart from each other every two feet down the seam line. Do this approximately 18 inches away from the seam. Most installers use one turf nail on each side, but this may not be enough to prevent the seam line from moving during thermal expansion and contraction.
ALWAYS CHECK AND DOUBLE CHECK THE GAUGE WIDTH DURING THE ENTIRE CURING PROCESS!!
Accurately Placing Seaming Tape


It is important to secure the placement of the seaming tape directly in the middle of the two connecting sections of turf. This gives equal adhesion for both sections. Place the seaming tape tightly against the soil with no wrinkles to prevent lifting or foot drag.
When securing the seaming tape with embeds (nails/staples), make sure you don’t over-drive the nail into the seaming tape. Excessive adhesive will rest in the depression of a nail head and may cause issues with seeping through seams and/or drainage holes, and it may become extremely visible.

SGW seaming tape is manufactured with a plastic film on one side. This plastic film side is to be placed face down on compacted soil. If this type of seaming tape is placed upside down with the plastic film facing up, the seam will rupture when expansion or contraction occur. The image to the left was a project that failed due to improper placement of the seaming tape. The entire putting green had to be reinstalled.
Manpower, Teamwork, & Applying Adhesives


“If you short yourself on manpower, your seams will be short of quality”.
JW
Seaming productively requires teamwork. Do you want to be an expert at seaming? Then you will need to create a team with tasks and a plan of execution. You must have plenty of help for the length of the seam. This allows better control. The picture at the upper left shows 6 men installing a putting green seam. As you can see, they have full control of the two sections. With enough men per foot you can;
- prevent the edge of the turf from dropping/flipping onto the troweled adhesive
- place the seam to its manufactured gauge width
- double check seam width
- pull fibers upright
- bag for compression
- perform quality control while curing
- install thousands of square feet in one day
Placing inferior adhesives in the hot summer months can cause expansion, foaming, and seepage through the seam line and drainage holes. When this happens, the seam will become visible and may need to be replaced. One bad seam can ruin the entire project. Using moisture cure adhesives that create excess foaming properties can also cause a seam failure. Excess foaming causes the seam to lift and rise. When this happens, the fibers fan open and may become visible, especially after placing infill. Adhesives that are applied too thinly will cause seam rupture.


I recommend using Superseam Pro 444 adhesive sold exclusively through SGW. It does not foam, can be applied in extreme weather conditions, and outlasts the turf warranty when applied correctly.
Seam Compression


Ask JW Bagging Method
If you want to perfect hiding your seams, this is a trick I created to assist in the magic of invisibility. This technique elevates the fibers vertically to integrate memory of their position and helps prevent excessive adhesive from reaching the fibers. When the infill bags are removed, the method causes the fibers to cross, integrate, and hide the seam line.
- When placing the first bag, place it vertically and lay it over a team members hands.
- Assist in flattening the bag to create even compression.
- The team member will pull his hands from underneath the bag, pulling or clawing the turf fibers vertically.
- Repeat these steps until you have reached the end of the seam.
“ Below is a video that will assist you in this seam bagging technique… Try it, you will be amazed”…. JW

Make sure each bag is tightly placed together. If there are gaps in the bags, it will cause small ripples in the seam and may not be able to even out after.
Ask JW Plastic Cap Nail Compression Method Over Shock Pads

Like I have mentioned throughout my previous columns, compression of adhesives will create longevity between the bond and the backing of the synthetic turf. When installing seams over a shock pad, the cushion of the padding may cause the seam to move, especially if you’re not careful. Stepping alongside the seam line on top of foam shock pad alone can move the seam a ½ inch. Placing plastic cap nails temporarily for compression works great when seaming on top of shock padding. The grooves in the nail bonds help compress. When stitched correctly, it will allow the adhesive to cure with a strong bond.
Infilling & Seams


Infilling is crucial to creating and camouflaging a seam. I have witnessed installers take their time cutting, securing, and perfecting the seam, only to have their co-worker mess it up by placing too much infill at once or power brooming the wrong way. Learning how to infill a seam is a talent. When you can make a visible seam disappear by placing infill by hand, then you have mastered the invisible seam.
Power Brooming


When it comes to creating invisible seams, a power broom can be your best friend or your worst enemy. As I mentioned earlier in the series, overbrushing of fibers can be a problem when it comes to visible seams. Installers don’t understand that aggressively abrading the turf fibers to hide seams will cause the seam to become different in color due to the reflection of light off each fiber. Synthetic turf fibers are plastic-like. They are flexible, strong, and can withstand decades of seasons, but when the outer surface of the fiber is abraded, it will receive light differently than other fibers that are not. Be careful not to aggressively brush seam lines or you will be sabotaging all the hard work you just put into making it invisible.


“When you have built confidence within yourself, you will be the one that builds your skills into a craft. Your care, concern, and compassion for synthetic turf will create craftsmanship and make you a leader of the pack. You will be the one that will be taking the lead on the seam integration. You will make mistakes and wrong cuts, but making mistakes is how we become better at anything we do in life. I became the best at seams by learning all the downfalls and issues that came with decades of perfecting seam integration. You must never stop honing your craft. Remember what I said in my earlier series: it takes research and studying on your part to be the best at anything you set your mind to.”
JW
For more information regarding seam integration, contact JW at askjw@sgwcorp.com or call 888.846.3598


