
The most important part of the installation process is seaming two sections of synthetic turf together. This month I will be explaining why this skill is important as well as which tools to utilize within the installation in conjunction with the many types of sub grade materials.
Critical Terms to Remember:
- Caliche -(ka-lee’-chee) a sedimentary rock, a hardened natural cement of calcium carbonate that binds other materials—such as gravel, sand, clay, and silt.
- Rockbound – bouldered, inflexible, hard, stone-like
- Clay – a type of heavy soil when becomes wet and hardens when it dries
- Loam – soil composed of a mixture of sand, clay, silt and organic matter.
- Sand – a loose pale brown substance that you find at a beach or in the desert, formed from very small pieces of rock
- Silt – sand, dirt and very small rocks that are carried from one place to another by moving water
- Subsurface groundwater flow – when the soils become saturated due to water intrusion.


If the sub grade soil contains any of the materials listed above, I recommend the seam tape and glue method. By utilizing staples for installation involving the harder subgrade materials, the staples will bend due to the subgrade’s unpliable characteristics and will subsequently cause the turf seam to move. The results will be visible to the eye, so try to avoid staples if the subgrade materials are listed above.
If the soil consists of a soft dirt-like loam, sand or silt, I recommend using the seam tape and glue method, as well. Seams will move over time due to the soils integrity, especially when there is sub-surface groundwater intrusion.
Please Refer to the Products List Below:

SGW Tape
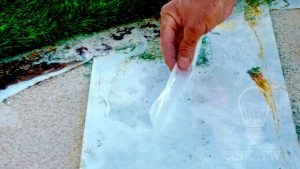
This product is a double-sided non-adhesive seam tape that has superior tensile strength, shear and tear resistance. Our seam tape is 12 inches wide and has a plastic film on one side to prevent ground moisture effecting the curing process.
** PLEASE NOTE: THE FILM SIDE MUST BE FACED DOWN ON TOP OF YOUR SUB-GRADE OR YOU WILL HAVE FAILURE WITH YOUR SEAMS.
See picture below.
The adhesive should be applied to the dull side of the tape. Synthetic Grass Warehouse seam tape works great for any synthetic turf seaming process. Seam tape is available at any custom length with a maximum length of 328 feet per roll.

SGW Nails
SGW nails are available as five and six-inch non-galvanized nails that will absorb moisture and bond to the existing sub grade over time to further secure the turf.

SGW Staples
Much like the staples you use to secure paper together, our flat-topped 11-inch gauge staples are much larger and serve a greater purpose in a synthetic turf installation. Often used in the install process as a substitute for glue and seaming tape (when sub grade materials are stable and compacted at approximately 80%), these staples save time with the install process and eliminate the possibility of disfiguring the fibers.
***LET’S BEGIN!***
Seaming with Staples
When implementing the staples method, make sure your seam is placed together properly as discussed in my May 2015 column: “The Most Recognized Problem in the Synthetic Turf Industry Today: Seams.”
The staples must be a minimum of 4 inches apart down the seam. If they are secured any farther away, the staples cause the turf to “ripple” when the temperatures become hot. Make sure you drive the staple down to the base of the turf’s backing. Add nails in for extra support, as well. Avoid driving the staple down too hard as it will not only create a divot, but it will also cause the seam connection to “lift.”
Seaming with Seam Tape & Glue

If you decide to use the seam tape and glue method, make sure you get both sections of turf together and secure the outside of seam approximately 15 inches with nails (you may pull them after the glue has cured) then place weight on top of the seam for compression for about an hour. If you are using a power broom, always wait until the glue is cured to avoid unnecessary damage or cause the seam to fold.
A rule of thumb: ALWAYS power broom or FIBRILATE your turf parallel to the turf seam. If the turf is power broomed perpendicular to the seam, this will also fold up any area of the seam that is not fully cured.
Do not take any chances! Find out the sub grade conditions prior to any seam installation and choose to use either staples and nails or seam tape and glue for your seaming process.
Stay Tuned for Next Month’s “Ask J.W.” Installment!
For more information contact J.W.: askjw@sgwcorp.com or call 888.846.3598


