


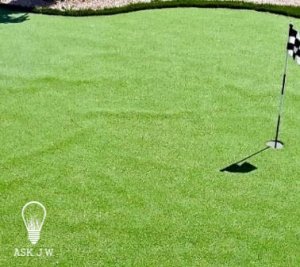
Hello, everyone! I hope all is well. In my last column, I wrote about how placing infill causes imperfections in putting green surfaces. We also learned that placing infill at proper elevations supports ballast, reduces wear, prevents settlement/depressions, and maintains Stimpmeter speeds. This month, I will teach a process that I developed decades ago called “cutting”. This easy technique creates a smooth putting surface and maintains Stimpmeter speeds.
Decades ago, I had built a putting green in my backyard. Being an average golfer, I built the putting green so I could practice four long putts going each way and multiple short putts. After playing on it for two years, the surface became uneven in places that I had continuously walked on. These uneven areas caused the ball to swerve due to the depressions in the surface from continuous foot traffic. It couldn’t have been the base settling because it was compacted to 95%. The Stimp speeds became variable due to the surface becoming uneven and were much different from the first day that I installed it. I followed the manufacturer’s specifications of how many pounds per square feet of infill to place. I placed the infill from north to south, east to west, and every which way imaginable as evenly as I could. I even rolled it for an entire day. After getting on my knees and inspecting the surface, I realized what was really going on. I found that the infill levels below the fibers were not evenly smooth throughout the entire surface. After months of putting practice, the surface was pressed to the infill levels which caused the surface to be uneven. I tried rolling the surface many times to see if this would flatten out the unevenness, but to no avail. Therefore, I developed the cutting process.

What is “Cutting” of Putting Green Surfaces?


“Cutting” is a physical process that I developed decades ago when building synthetic turf putting greens. This does not mean you need to go out and purchase scissors. This process is much like grading machines when leveling dirt. Instead of using heavy grading machines, we will be using stiff asphalt brooms and/or gas-powered brooms to do the cutting. A putting green’s longevity relies on your ability to create a smooth, playable surface. The turf product may pass the warranty period, but smoothness and Stimpmeter speeds will not.
The “cutting” process is a must when installing putting greens, especially if you are installing for an avid golfer.
Prior to learning about cutting putting green surfaces, understanding the importance of infill and its placement is crucial. Let us recap on “Infill & Foot/Weight” that was learned in my past column, “Perfecting Putting Green Surfaces” Part 2.
Missed it? No biggie, just click on this link to catch up.
Infill & Foot Weight


Products Specifications
Always order infill amounts per each product’s specification. If you do not place the required amounts of infill for putting greens, you will have future issues on your hands. Putting green surfaces need ballast.
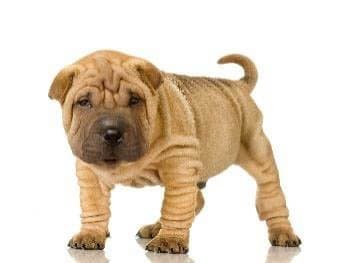
If your team feels that they have placed enough by eye and don’t respect the required amounts, you will succumb to thermal expansion and/or contraction which will cause wrinkling and possible seam rupture. I have witnessed installers bringing back pallets of infill to their yard thinking they placed enough. Little did they know they had shorted the placement by 2000 lbs, which is why the putting green wrinkled like a Shar-Pei dog.
Importance of Infill/Granule Size
When placing infill into texturized putting green surfaces, it is very important to understand sieve size. In the synthetic turf industry, sieve size refers to the size of the granule/infill. The granule size will determine how it will drop into the putting green’s surface and into the base of the turf. If the size is too large, it will not drop easily into the base, especially if the fiber has been frayed. I will touch on fraying later in this column.
“The object to infilling putting greens is to place from the bottom up”
Using a substandard infill/size will create voids and neglect being a dense system. For this to happen, the infill must pass through the top surface and work its way to the bottom. If the infill granule size is too large, it will not settle and will remain within the middle. When this happens, it may lead to an uneven surface.

Precipitation (rain, snow, sleet, or hail) can wreak havoc on synthetic turf putting green installations. You’ve heard the saying “fail to plan, plan to fail”. If you are intending to place infill into putting green materials that have any moisture, it will have an adverse effect on Stimpmeter speeds and the way the ball rolls. Sending your teams out to install infill when there is a chance of precipitation will cost you time, money, and lots of frustration.
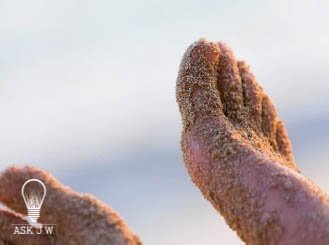
When moisture meets synthetic turf fibers, it sticks to the fibers and prevents infill from dropping into the base of the synthetic turf. Moisture can prevent infill from doing its job. Placing infill when synthetic turf fibers are wet is like trying to get wet sand off your feet when you leave the beach.
https://syntheticgrasswarehouse.com/ask-jw-infill-placement-moisture/
Envirofill (Small Sieve Size)

I recommend (small) Envirofill as the primary infill to ballast synthetic turf putting greens. I recommend the smallergranular for ease of placement. This will prevent trapping fibers and creating static electricity. Envirofill is made of acrylic-coated silica sand which repels moisture and prevents unpleasant odors. Envirofill is great insurance, especially if Fido decides to take a dump three feet from the cup. Envirofill granules allow for easy clean-up and flushing. Because of the antimicrobial coating, Envirofill helps inhibit the growth of mold, mildew, and other harmful microorganisms.
Envirofill is a colored and sealed silicon dioxide (SiO2) and is free of dust. The rounded, uniformly sized beads reduce abrasiveness to surrounding turf fibers by up to 50 percent. Envirofill is much heavier than other infill options that installers are using.
Zeolite is NOT heavy enough to be used as a primary infill for putting green surfaces!

Infill provides stability for synthetic turf. Zeolite is primarily used as an added infill, which is placed as a “top-dressing” in pet turf areas to manage odor control. When Zeolite is wet, it absorbs up to 81% of its original weight. However, once the granule dries out, it returns to its original state and is not heavy enough to keep putting green surfaces ballast, which may allow wrinkles to show up in the middle of the summer.

Zeolite is not made to withstand heavy traffic, so it may break down and cause Stimpmeter speeds to fluctuate. The granular structure resembles a “honeycomb” appearance and does not constitute a stable grain to be installed as a complete infill, especially for putting greens. It is much softer infill than Envirofill or silica sand, which makes it a bad candidate to be used as an infill for putting greens. The Mohs scale of mineral hardness characterizes a mineral’s scratch resistance, with the higher scores indicated greater durability. The Mohs ratings of each infill is as follows:
ZEOLITE: 3-5 / SILICA SAND: 6-7 / ENVIROFILL: 7-9

Static Electricity
Always be mindful of static electricity while incorporating your infill. When using a substandard infill and infill size, the installer must aggressively scrub the infill with either a push broom or fibrillating machines to work the infill below the surface. However, excessive scrubbing creates static electricity which causes most infill to stick to the fibers, therefore never allowing it to reach the base of the putting green material.
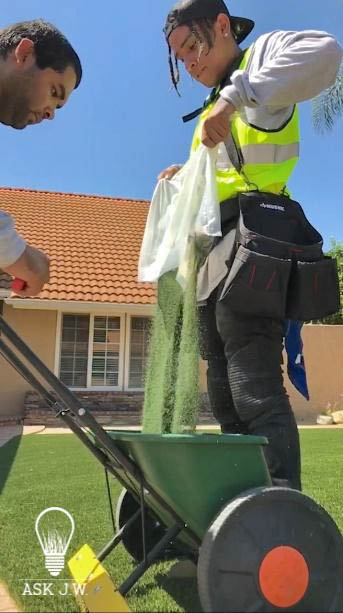
Dropspreaders


When it comes to putting greens, you will fail your project and your project will fail you if you do not pay attention to the details of infill placement. Invest in a quality drop spreader. A drop spreader drops a measurable path of granules onto a surface. When using a drop spreader for synthetic turf, the drop spreader drops infill vertically into the fibers at an evenly distributed path with precise application.

For landscape turf installations, I recommend purchasing a small to medium size drop spreader. The average backyard install is approx. 450 sq. ft. I recommend purchasing a size that will serve your average installation, and it will be easier to store. Most supply houses carry Scotts Classic Drop Spreader, which costs approximately $70. This is my favorite! I have used Scotts Classic Drop Spreader for decades. It is very strong, everlasting, and made of composites that withstand below freezing temperatures.

I recommend purchasing a size that will serve your average installation, and it will be easier to store. Most supply houses carry Scotts Classic Drop Spreader, which costs approximately $70. This is my favorite! I have used Scotts Classic Drop Spreader for decades. It is very strong, everlasting, and made of composites that withstand below freezing temperatures.

I highly recommend the turf brush attachment. This attachment immediately brushes infill into the turf fibers as it drops it.

I do not recommend placing infill into synthetic turf with a Whirly Broadcaster. This will not place infill into putting greens with precise application.
The “Symphony” of Placing Infill

Infill placement is an art form. The way you place infill is beneficial or detrimental to how the ball will roll. Why bother getting out a Stimpmeter if you do not know how to properly place infill? Dumping and brushing sand into the surface thinking “this will do” will only cause go-backs
Below are a few examples of why I feel placing infill is like being a conductor in a symphony.
- If your drop spreader is dirty and/or clogged, it could affect the playing surface.
- If your infill is wet, it could affect the playing surface.
- If you have the rate controller on too high or too low, it could affect the playing surface.
- If you are walking too slowly or quickly when placing the infill, it could affect the playing surface.
- If you are not placing infill in equal amounts, it could affect the playing surface.
- If you are placing the infill in an uneven pattern, it could affect the playing surface.
- If you do not overlap your drop spreader runs, it could affect the playing surface.
- If you overlap too much, it could affect the playing surface.
- If you stop and start in the middle of drop spreader runs, it could affect the playing surface.
- If the drop spreader is left open when stopped, it could affect the playing surface.
- If you place too much at one time prior to brushing into the surface, it could affect the playing surface.
- If it starts to rain prior to completion of the infilling process, it could affect the playing surface.
I know this can be a bit confusing and too much to comprehend, but it is crucial to know how much to place, how fast to walk, and how to know when enough is enough. These are steps we must learn to synchronize in order to be great at perfecting putting green surfaces.
Infill Placement for Texturized Nylon/Poly Putting Greens


Texturized putting greens come in different heights, weight, and fibers. Most texturized putting greens are approximately ½” and easy to infill. To evenly distribute infill in texturized putting green products, I recommend placing infill into lifts. Placing excessive infill in one run/pass may trap the fibers and cause irregular ball roll.
Start the first run/pass by drop spreading the infill going east to west, then north to south. Depending on the product’s infill specifications, I recommend placing a maximum of 1/8” to 1/4” for all completed runs/passes prior to brushing into the base.

- Open the drop spreader to the maximum rate setting.
- Walk at an even pace for every run/pass.
- Pass your putting green’s edge when you are turning around to prevent excessive placement of infill.
- It may take 10 passes (5 up & 5 back) or more to achieve 1/8” to 1/4’” of an inch of placement. Keep track of
- How many runs/passes that will give you ¼” prior to brushing.
Brushing Infill


Many contractors fail to provide a smooth putting surface due to the type of tools and equipment they own. The type of brush/broom, bristle, and stiffness is crucial for infill placement. I recommend using an asphalt broom with bristles that are stiff and spaced further apart then a soft bristle broom. The stiff bristles do not bend easily when scrubbing the infill into the base. Using bristles that are tightly woven and soft will slow down the infill placement. Even though it may take longer, using a smaller brush head is great for beginners. This allows better control of the placement.

When you have accomplished placing and brushing in the first lift, it is time to change direction and cross the existing pattern (like the image to the left). Place another 10 passes (5 up & 5 back) or more to achieve placing 1/8” to 1/4’” of an inch of infill placement. Keep track of how many runs/passes that will give you 1/8” to 1/4” prior to brushing the second lift. It may be 12, 15, or even 20 passes to gain the desired lift. Repeat this until all the calculated infill is placed and has reached the top of the surface where it is visible to the naked eye.
*** DO NOT OVERFILL EACH PASS***
(Reminder) STATIC ELECTRICITY
Always be mindful of static electricity while incorporating your infill. When using a substandard infill and infill size, the installer must aggressively scrub the infill with either a push broom or fibrillating machines to work the infill below the surface. The excessive scrubbing creates static electricity and causes most infill to stick to the fibers, therefore never reaching the base of the putting green material.
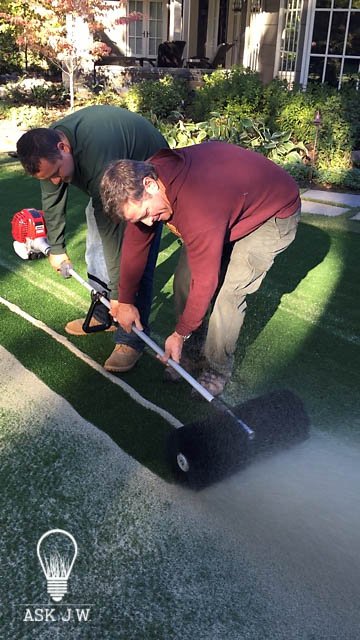
Cutting Textured Nylon/Poly


As I explained above, the cutting process is a method that cuts the infill levels just below the top of the fiber’s surface. This will ensure that all the infill is smooth and even just a tad below the turf’s fibers. Years of play will settle the fibers to the level that is cut. If the infill levels are NOT placed at the correct height, the surface will settle, depress, and cause irregular ball roll. If you do not have a power broom, an asphalt broom will work fine for cutting; it will just take some muscle to accomplish, but it will work. I recommend overfilling the surface, then cut just below the turf’s fibers.
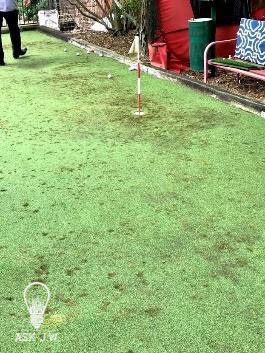
I recommend cutting the surface in all directions to ensure a level playing surface. This diagram to the left is a good example of cutting patterns.
True Putt

True Putt is a 1” pile height, PE slit film putting green turf for avid or professional golfers. It requires 6-8 pounds of infill. Once the turf fibers are filled in progressions/lifts and leveled to the surface, the power broom and its bristles are used in a strategic way to “cut” infill elevation approximately ¼” from the top fiber surface.
Infill Placement – True Putt


“All infill” putting greens are much different than a texturized putting green product. An “all infill” product is made up of slit film and takes twice as much infill as texturized putting greens. You may find that your passes may be less than required. It is up to you to view the placement and make your own determination of how much to place in one lift. Remember, excessive brushing may cause static electricity.

Placement of infill for True Putt is totally different from placing infill for any other putting green. It is crucial to maintain the verticalness of the fiber throughout the infilling process. If the True Putt fiber gets frayed while placing infill, this will prevent infill from dropping to the base with ease. I recommend never using a power broom prematurely on an “all infill” putting green. A stiff, nylon bristle broom should be used until the last lift is placed. After that, the power broom can be used for the cutting process.

Let us imagine that the turf’s fiber is like the end of a rope. If the rope/fiber is frayed, it will not allow the infill to drop to the base.
The longer you keep the fiber in its tightly woven state, the better your putting green’s surface will turn out.
FYI: excessive foot traffic may cause fraying of fibers, so tread lightly.
Therefore, it is important to strategically place infill into putting greens without fraying the tips of the fibers.

!DO NOT OVER-BRUSH, POWER BROOM, OR SPLIT FIBERS DURING THE INFILLING PROCESS!
To evenly distribute infill for the True Putt product, I recommend placing infill into lifts. Placing excessive infill in one run/pass may trap the fibers and cause irregular ball roll.
Start the first run/pass by drop spreading the infill going east to west, then north to south. Depending on the product’s infill specifications, I recommend placing a maximum of 1/4” for all completed runs/passes prior to brushing into the base.

- Open the drop spreader to the maximum rate setting.
- Walk at an even pace for every run/pass.
- Pass your putting green’s edge when you are turning around to prevent excessive placement of infill.
- It may take 10 passes (5 up & 5 back) or more to achieve 1/4’” of an inch of placement. Keep track of
- how many runs/passes that will give you ¼” prior to brushing.
I recommend having one person place the infill. Having multiple drop spreaders may lessen the perfection of placement.
When you have accomplished placing and brushing in the first lift, it is time to change direction and cross the existing pattern.
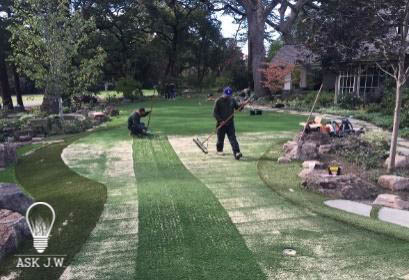 (Like the image to the left). Place another 10 passes (5 up & 5 back) or more to achieve placing 1/8” to 1/4’” of an inch of infill placement. Keep track of how many runs/passes that will give you 1/8” to 1/4” prior to brushing the second lift. It may be 12, 15, or even 20 passes to gain the desired lift.
*** DO NOT OVERFILL EACH PASS***
Brushing Infill Into True Putt


When brushing the infill into the True Putt product, I recommend the “jiggle and vibrate” method. This small movement with the broom head will jiggle and vibrate the infill down into the base of the fibers without fraying the tips of the fibers. If you are a beginner, I recommend using a smaller broom like the yellow one pictured above. This will allow the beginner more control without fraying. (*See attached video*)
(Reminder) STATIC ELECTRICITY
Always be mindful of static electricity while incorporating your infill. When using a substandard infill and infill size, the installer must aggressively scrub the infill with either a push broom or fibrillating machines to work the infill below the surface. The excessive scrubbing creates static electricity and causes most infill to stick to the fibers, therefore never reaching the base of the putting green material.
Cutting of True Putt


Having a power broom is a must when cutting True Putt. The object of the cutting method is to cut ¼” of infill/sand below the top fibers. This process can be very physical and time consuming. The lower you hold the power broom, the better it is at cutting. When you lift the handle too high, it will dig into the surface and remove too much infill.
The direction of the cutting process is like the infill placement process. Start the first cutting pass by going east to west, then north to south.
When you have accomplished cutting east to west and north to south, it is time to change direction and cross the existing pattern.
(Like the image to the left). This will ensure all infill/sand is cut level for a smooth playing surface.

I recommend using a 4’x8’ sheet of Masonite when cutting excess infill/sand from contaminating exterior landscape.

I recommend placing infill around seams by hand. This will prevent excessive brushing which may cause seam separation.
I also recommend placing infill by hand around putting green cups. This will prevent excessive infill that creates issues in elevation and ball roll near the cup.
A plastic bristle brush works great for working the infill into the fibers without damaging them.
Compression Rolling


Compression rolling is another crucial process in perfecting putting green surfaces. We have spoken about how foot/weight and years of wear and tear can depress, settle, and damage the golf ball’s ability to roll smoothly. Compression rolling will prevent immediate depressions and/or settlement of fibers. Compression rolling texturized putting greens is much easier and faster than compression rolling the True Putt product. Texturized putting greens compress quickly when using the proper weight and roller. The heavier the roller, the faster the compression will take.
Prior to rolling the True Putt, it is important to inspect the entire surface to ensure the infill elevation is approximately ¼” below the top fibers.
If you witness any areas that are less than ¼”, I recommend cutting more infill until you have reached the ¼” mark.
If you witness any areas that are less than ¼”, I recommend placing more infill until you have reached the ¼” mark.

Compression rolling True Putt bends the ¼” fibers that are revealed and removes its memory. This will mash the fibers in all directions and cover any infill that was present. When the rolling is complete, the surface should play between 10-12 on the Stimpmeter scale.
If you have any fibers that are remaining vertical, extra rolling may be required.
FYI: Winter weather may create longer rolling times due to the fiber’s ability to stay vertical in the cold.


For more information regarding perfecting putting green surfaces, or to schedule a training please contact J.W at 888.846.3598 or email AskJW@SGWcorp.com
Suggestions for the use of ASK JW installation techniques are solely at the end users’ discretion; however, the user should determine suitability for the intended use by his/her own evaluation. Because the use of the materials is beyond our control, neither ASK JW nor SGW shall be liable for the outcome of any use of said materials including any injury, loss, or damage, direct or consequential, arising out of the use or inability to use these techniques and products.


